Sunday, August 1, 2010

Get Growing in August

Get Growing


Welcome to our ninth Get Growing entry. This series will span 12 months, and is designed to help aspiring vegetable gardeners get out of the kitchen and into the garden. On the first of each month, we will discuss one garden project for the novice vegetable gardener. Because we are located in Houston, Texas, our growing conditions differ from many parts of the English-speaking world. To help guide gardeners in cooler climates, our Get Growing partner is Daphne of Daphne's Dandelions. Daphne gardens in Boston, and she will be providing monthly advice for Northern gardeners (although her excellent site is a wonderful resource for gardeners everywhere). This month, Daphne discusses preserving your vegetable harvest.  Regardless of where you live, her advice is invaluable.

Zone 9 in August

While many parts of the country view August as the last month of summer, here in Zone 9 summer usually stretches into late September or even October.  In fact, it's not uncommon to go trick-or-treating on October 31st in shorts and flip flops.  But August is a great month to start planning the fall vegetable garden.  

There are three components to the fall garden:  summer vegetables that have a second growing season in the fall; succession crops that grow year-round in Zone 9; and vegetables started in the fall for a spring harvest.

In the first category, the most popular summer vegetable to start for fall harvest is tomatoes.  In Zone 9, it gets too hot for tomatoes to flower or fruit during July and August.  Many of our plants are still alive, but we haven't seen a flower in months.  And, it's not a bad idea to replace those plants that didn't survive the heat with new seedlings.  Because the growing season can be short in the fall, choose varieties that are quick to mature.  And be emotionally prepared to lose these plants earlier than expected if there's an early frost.  The flip side is that there may be no frost, or only a mild frost, so these plants may survive for many months to come.

Other several warm weather vegetables that can be started now include snap beans, tomatoes and bush lima beans.  

August is also a good time to plant succession crops of plants that are dying back after a long summer of productivity.  We are planting new arugula, dandelion greens, and basil now.  Herbs in general are ideal to start now.  Cilantro, parsley and dill, all hate the extreme heat of July and August, but will do well all fall (and maybe even winter) if started now.


Another great project for August is to start sourcing seeds to start in September or October when it cools off which won't be harvested until next spring.  These vegetables will not grow much during the cool winter months, but as soon as the temperatures start warming up (usually in February), they will start maturing rapidly.


The list here is long, including carrots, fennel, radish, lettuce greens, collard greens, kale, Swiss chard, chicories, fava beans and chickpeas.  We have not had great luck with broccoli, cauliflower and Brussels sprouts in our garden, but if you want to give them a try, they need to be started in October or November.


It has been a long, hot summer.  We have spent as much time as possible indoors, and the garden has had to make do for days at a time.  Luckily, Houston has also had quite a bit of rain, so our plants are thriving despite the extreme neglect.   It is not easy to think about cool-weather crops right now, but if you do, you will be rewarded with an abundant vegetable harvest in the fall and again next spring.


StumbleUpon.com

Thursday, July 1, 2010

Get Growing in July

Get Growing


Welcome to our eighth Get Growing entry. This series will span 12 months, and is designed to help aspiring vegetable gardeners get out of the kitchen and into the garden. On the first of each month, we will discuss one garden project for the novice vegetable gardener. Because we are located in Houston, Texas, our growing conditions differ from many parts of the English-speaking world. To help guide gardeners in cooler climates, our Get Growing partner is Daphne of Daphne's Dandelions. Daphne gardens in Boston, and she will be providing monthly advice for Northern gardeners (although her excellent site is a wonderful resource for gardeners everywhere). This month, Daphne discusses insect control.  Regardless of where you live, her advice is invaluable.

 Zone 9 in July


July and August are the hottest months here in Houston.  Daily average temperatures top 95° and the low is rarely below 70°.  It takes a hurricane or tropical storm, like Hurricane Alex that is fast approaching Texas, to cool things off here.  This extreme heat is hard on most vegetable plants with a few notable exceptions.  We've already recommended eggplant and lima beans, both of which are thriving in our garden right now.  Another vegetable that loves our July weather is chile peppers.

Chile peppers are in the eggplant and tomato family, and are highly productive when it heats up outside.  We have had excellent results with Anaheim (above) and Jalapeno (below) as well as Cayenne, Poblano, and Serrano chiles.  The plants need little care or attention, and will produce small flowers that are attractive in the garden.  In fact, ornamental pepper plants are quite popular here in Houston even though the fruits are inedible.  Why not grow the real thing instead?


Pepper plants are easy to start from seed.  The seeds are quite small, so we prefer to start these in pots rather than direct sowing.  Transplant when the seedlings have four or more leaves, keeping well watered before and after transplanting.  Try to shade transplants during the hottest part of the day to avoid scalding and killing the plants.  And don't go overboard with seedlings.  Only a few plants are enough for the whole family because the plants are quite productive, and fresh chiles are extremely potent.   If you haven't already started your seedlings, it's not too late, although next year we suggest you get an earlier start.  We've been harvesting peppers for months.
Chile peppers can be used in any number of tacos, quesadillas and salsas.  We often use them to season pasta and vegetable dishes as well.  And any extra peppers are easy to dry and save for later.  
We were still using dried cayenne peppers from last summer almost a year later.  We dry ours indoors because the humid weather here tends to rot everything that is left outside.  In more arid climates, it is recommended that the peppers be left to hang outside in a sheltered spot until dry.

Growing Lima Beans

StumbleUpon.com

Monday, June 28, 2010

Double Apple Bundt Cake

This cake is made with both applesauce and diced Granny Smith apples.  We used a chunky applesauce, but feel free to experiment with your favorite style.  The cake is wonderfully moist and aromatic, and makes a nice afternoon snack with a cup of creamed tea, or a tasty evening dessert.

Double Apple Bundt Cake

Ingredients

1          cup            butter, room temp
2          cups           sugar
5                           eggs
1 1/2     tsp            vanilla
2           tsp            lemon zest
3           cups          unbleached A.P. flour
1 1/2     tsp            baking soda
1/2        tsp            baking powder
1 1/2     tsp            cinnamon
1/4        tsp            salt
1/4        tsp            nutmeg
1/4        tsp            allspice
1/4        tsp            ginger
1 1/2     cup            homestyle applesauce with cinnamon and brown sugar
2                            granny smith apples, peeled and diced

Procedure
  1. Preheat oven to 300° convection (350° conventional), place shelf in middle of oven.
  2. Butter and flour bundt pan.
  3. Combine dry and set aside.
  4. Cream butter and sugar.  Add eggs one at a time, mixing well and scraping bowl each time.
  5. Add lemon zest and vanilla and combine well.
  6. Alternate between adding dry and apple sauce, starting and finishing with dry.
  7. Fold in diced apples, then fill bundt pan.
  8. Bake until done through to center and cake is golden brown, 80 minutes in our oven.
  9. Cool on rack completely, then remove from pan.  Serve at room temperature.

StumbleUpon.com

Friday, June 25, 2010

Tofu with Swiss Chard, Kale and Yogurt Sauce

Summer is in full swing here in Texas.  Afternoon temperatures reach 100° every day, and we've had an unusally dry month.   The eggplants and basil are thriving, which is to be expected, but so are vegetables we left for dead several months ago.  This includes escarole, wild chicory, Tuscan kale and Swiss chard plants.    The kale and chard plants are actually quite full and beautiful right now even though they shouldn't be given our hot, dry weather.
We prepared a combination of kale and chard for a lovely side dish topped with a thick yogurt sauce.  We loved the cooked greens so much, the next night we decided to harvest more kale and chard, and then add tofu and rice to convert this side dish into a meal.    It was quite a surprise to be enjoying homegrown kale and chard twice in June, but we found the combination of the cooked greens, tofu, rice and yogurt to be a perfect summer dinner.   We highly recommend either version the next time you are lucky enough to find Swiss chard and lacinato kale.

Tofu with Swiss Chard, Kale and Yogurt Sauce

Ingredients

3/4          lb            extra-firm tofu
                              peanut oil
2             cups         jasmine rice
1                            red pepper
1              lb            Swiss chard, stems removed and choped
1              lb            Lacinato kale, stems removed and chopped
2              Tbs         olive oil
2              cloves     garlic, minced
1              cup         Greek-style non-fat or low-fat yogurt
1/4           cup         tahini
3              Tbs         fresh lemon juice
3              cloves      garlic, minced
1              Tbs          olive oil
1/4           tsp          crushed red pepper
1               Tbs         flat-leaf parsley, chopped

Procedure

  1. Cook rice.
  2. Place tofu between several sheets of paper towel, then place a plate on top, and weigh the place down with something heavy.  Leave for about 15 minutes for water to drain out, then remove paper towels and cut tofu into 1" cubes.
  3. Heat peanut oil over medium high heat, then fry tofu until golden brown.  Flip and repeat.  When cooked, remove from pan and set aside.
  4. Roast the red pepper over a gas flame or in the oven under the broiler until it is charred all over.  Place in a bowl and cover for 10 minutes.  Remove as much skin as possible, seed, then cut into small pieces.
  5. Heat 2 Tbs olive oil over moderate heat, then add two of the minced garlic cloves.  Cook about 1 minute, then add chard and kale and cook until tender, about 10 minutes.  Add red pepper and cook another minute or two.  Remove from heat and let cool.
  6. In a mixing bowl, combine yogurt, tahini, lemon juice and 3 minced garlic cloves.  Season with sea salt, then set aside.
  7. Heat 1 Tbs olive oil over medium heat, then add crushed red pepper and cook until it begins to sizzle, about 10 seconds.  Remove immediately from heat and, when cool, combine with yogurt sauce.
  8. Toss cooked greens with tofu, then serve on a bed of rice.  Add dollup of yogurt sauce on top, and serve with more on the side.
Printable Recipe

StumbleUpon.com

Wednesday, June 23, 2010

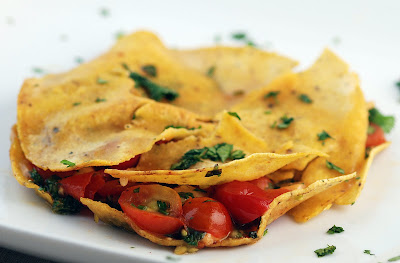
Cherry Tomato and Aged Gouda Quesadilla

Cherry tomatoes get no respect.  They're a throw-away item on every salad bar, and are often ignored at the grocery in favor of bigger varieties.  It doesn't help that store-bought cherry tomatoes are usually utterly lacking in flavor.  They are also admittedly difficult to work with for some recipes calling for slices of tomatoes or cooking tomatoes.
But for the gardener, cherry tomatoes are hard to beat.  The plants are highly productive even in our hottest weather when full-sized tomatoes are impossible to grow.  Cherry tomatoes are available in many varieties that resist both disease and insect attacks, and they ripen to perfection on the vine without splitting, rotting or dropping.   Available in several sizes and colors, some of our favorite varieties are "Matt's Wild Cherry" (the tiniest and sweetest cherry tomato we've grown), "Yellow Pear" (which produces a ridiculous number of beautiful yellow tear-drop shaped tomatoes) and "Sugary" (which is an unusual oblong shape and pretty pink color).

The key with cherry tomatoes is to take advantage of their strengths.  Don't try making a tomato sauce or ketchup.  Instead, include these little tomatoes in pastas, salads, or even sandwiches.  These tomatoes are naturally sweet and juicy, and require only minimal, if any, cooking.
Here, we include these little tomatoes in another of our garden quesadilla recipes.*  Toss with basil, cilantro and chives to make a quick filling.  Add an aged gouda that has lots of flavor, and these quesadillas come together in just a few minutes.   The results are delicious, especially with cherry tomatoes freshly picked from the garden.


Cherry Tomato and Gouda Quesadilla


Ingredients

2         cups           cherry tomatoes, cut in half
1/2      cup             aged gouda cheese, diced
1/4      cup             cilantro, chopped
2         Tbs             basil, chopped
2         Tbs             chives, chopped
                            sea salt and black pepper
4                           corn tortillas

Procedure

  1. Combine tomatoes, cheese, cilantro, basil and chives.  Season with salt and pepper.
  2. Sandwich half of the mixture in between 2 tortillas.  Repeat with remaining filling.
  3. Heat vegetable oil in saute pan over medium and heat quesadilla until tortilla is golden brown.  Flip and repeat.  Remove from heat and cook second quesadilla.  Serve immediately.
Printable Recipe

*Other Quesadilla recipes from Vegetable Matter:
Chinese Kale Quesadilla
Butternut Squash, Jalapeno and Feta Quesadilla
Swiss Chard and Queso Fresco Quesadilla

StumbleUpon.com

Monday, June 21, 2010

Honeyed Snap Beans with Roasted Corn and Radish

Teamwork is essential when two or more people collaborate on a meal, but sometimes conflict is equally important. Last night's dinner is a case in point. When I ("I" being me, David, the heretofore silent, Teller-like member of our blogging duo) suggested a raw corn and radish salad, vegetarian Robin looked repulsed, reacting as if I had suggested a viscera and bone marrow stew. 

I mounted my defense.  "Corn and radishes seem very summery to me," I said.  Robin parried with a series of dismissive queries. "Raw corn?"  "Raw corn?"  "Why would I want to eat raw corn?"  Now, there were two ways I could have reacted to Robin's blunt criticism (Robin tends to be blunt with everyone, so I try -- usually without success -- not to take it personally). I could have stubbornly proceeded as planned  -- and slept in the guest room.  Or I could take her criticism as a challenge and create a better meal.  Not liking the guest room much (it aggravates my allergies), I chose the latter option.

I decided to collaborate with Robin on a new version of the corn and radish dish. I said I could roast the corn and radishes rather than serve them raw.  That idea got a thumbs up.  She suggested we add the green beans from the garden for added color and texture. I said that sounded great (I really don't like the guest room).  To stay with our cooked, not raw theme,  I proposed blanching and then sauteing the green beans, and adding caramelized onions.  Robin liked that idea, and the dish was now set. 

After tasting the final product, I reluctantly had to admit that Robin had been right to reject my initial concept (I'm not sure I actually vocalized my admission loud enough for Robin to hear it).  The resulting dish had a more complex blend of tastes and textures, and was more colorful, than my original recipe. Thanks to our conflict, we ate -- and I slept -- better that night.  

Honeyed Snap Beans with Roasted Corn and Radish

Ingredients

Dressing

2          Tbs           fresh lime juice
1                          jalapeno, seeded and coarsely chopped
1 1/2     tsp           honey
1/4        tsp           cumin
1/4        cup          vegetable oil
                            kosher salt and black pepper

Roasted Corn and Radish

4           cups         fresh corn kernels
2                          medium radishes, sliced into thin rounds
1 1/2     Tbs          olive oil
1/2        tsp           sea salt
1/4        tsp           black pepper

Green Beans

1           lb           green beans, stems removed
1           Tbs         olive oil
1           tsp          butter
1/8        cup         parsley, coarsely chopped
1/4                      small red onion, thinly sliced

Procedure
  1. Preheat oven to 425°.
  2. Dressing:  Combine lime juice, jalapeno, honey and cumin in blender.  With motor running, slowly add vegetable oil.  Season with salt and pepper and set aside.
  3. Roasted Corn and Radish:  Combine corn, radish rounds, olive oil, salt and pepper.  Spread in a single layer on a sheet pan and roast mixture for 10-12 minutes until done.
  4. Green Beans:  While corn is roasting, bring 4 quarts salted water to a boil.  Add beans and boil until just tender.  Drain and set aside.
  5. Heat oil and butter over medium in a saute pan.  Saute beans until starting to brown.  Remove from pan and add to corn mixture.  Add parsley.
  6. In same pan, caramelize onions over medium.  Add to corn and beans, then toss with the dressing.  Season with salt and pepper to taste.
Printable Recipe

StumbleUpon.com

Friday, June 18, 2010

Kolaches in Texas

Since we moved to Texas almost fifteen years ago, we have really enjoyed exploring the state.  With terrain ranging from the lush Piney woods of East Texas to the desserts out West, flat coastal land along the Gulf of Mexico and rolling hills inland, and mile after mile of highways in all directions, there always seems to be something new to discover.  Last week, we drove to Waco for the first time to drop our older son off at golf camp for a week.  The drive winds through farm country before hitting College Station (home of Texas A and M) and perhaps the largest concentration of McDonald's we've ever observed.  After that, there is little to see (or eat) before arriving in Waco almost two hours later.  The one exception is the Kolache oasis we discovered along the way.

We had never heard of Kolaches before moving to Texas.  Correctly pronounced KOH-lahch (although many say koh-lahch-EES), these sweet yeast pastries were brought to Texas by early Czech and Slovakian immigrants.  One hundred and fifty years later, kolaches can be found all over Texas, offered by every doughnut shop as well as chains with names like Kolache Factory and Old Towne Kolaches.  Although extremely popular for breakfast here in Houston, these mass-produced kolaches have never caught our fancy.
More interesting are the kolaches made by bakeries found in many small Texas towns now populated by descendants of the original Czech and Slovak settlers.  These bakeries often use a recipe brought from the old country by their ancestors.  We've had excellent kolaches in Fredericksburg, Boerne and New Braunfels to name just a few.  But last week we discovered the best yet -- Zamykal Kolaches.  Located in Calvert, a tiny town on the National Registry stretching just a few blocks along Highway 6 about an hour south of Waco, the bakery is in a restored building from the mid-1800's.  The smell was divine when we walked in, and the front counter was loaded with freshly-baked kolaches in over 20 flavors.
The owner/chef, Jody Powers, stuffed us with samples and named every single flavor before we had the difficult task of selecting a few to take home.  We decided on two chocolate varieties for the kids, and for us, we ordered a strawberry cream cheese and a pecan.   The pecan was our hands-down favorite, tasting like a combination of pecan pie and sweet brioche, but nothing disappointed.  We also picked up a jar of home-made wild grape jam, and some tasty chocolate fudge to give as a gift.   

Calvert is charming, but probably not worth the trip unless you're already in the area.  If you want to give Jody's kolaches a try without making the drive, though, Zamykal's will ship anywhere in the U.S.   If you're then inspired to make your own kolaches, we've had good luck with this old Czech recipe from Texas Monthly.  We particularly like these kolaches with a peach filling, perfect for this time of year here in Texas.

StumbleUpon.com

Wednesday, June 16, 2010

Texas Peach Cobbler

Peach season in Texas is not to be missed.  Roadside stands lining the back roads feature a ridiculous assortment of freshly-picked peaches as well as peach ice cream, peach pastries, peach pie, peach butter and peach preserves.   We have been planning our annual pilgrimage to Hill Country to gorge on these delights, but work and family obligations keep delaying our trip.  Luckily, this year the peaches came to us by way of our dear family friend Kenny.
Kenny gave us a big bag of peaches from Rhew Orchards in Floresville, a town southeast of San Antonio.  By the time they got to us, the peaches were perfectly ripe and so juicy that the bottom of the bag was leaking.  The fruit definitely had to be used right away, so we pulled out our favorite cobbler recipe.  This recipe works with almost any fruit, and is perfect in a pinch because it comes together so quickly.  We've used this recipe to make strawberry cobbler, blackberry cobbler, and rhubarb-strawberry cobbler.  The buttery biscuit topping can't be beat.  It complements the fresh peaches perfectly here, although frozen peaches would work well too if you aren't lucky enough to be in Texas during peach season.
Texas Peach Cobbler

Ingredients

Filling

6            cups        peaches, sliced
3            Tbs          unbleached A.P. flour
1/3         cup          sugar
1/8         tsp           cinnamon
                             pinch of salt

Topping

1 1/2            cup        unbleached A.P. flour
1/4               tsp         salt
1                  Tbs        baking powder
2                  Tbs        sugar (plus more to sprinkle on top)
4                  Tbs        unsalted butter, cubed and kept cold
1                  cup        heavy cream
                                 sugar for sprinkling                        


Procedure
  1. Preheat oven to 350 for convection oven, or 375 for regular oven.  
  2. Combine all the filling ingredients, mix well, and put into 8" pyrex baking dish.  Or, use individual ramekins to make individual cobblers (these are perfect for dinner parties if you're so inclined).
  3. Make topping.  First, combine all dry ingredients.  Then cut in the butter to resemble coarse meal using your fingers or a fork.
  4. Add cream and mix until uniformly moist.  Spoon out on top of filling.  It should be plopped on in clumps.  You don't want a perfectly smooth topping.  Sprinkle the biscuit generously with granulated sugar.
  5. Bake in oven until top is golden brown, about 40 minutes.  If you used a glass pyrex, you will also see the fruit bubbling.  
  6. Serve warm topped with clotted cream, whipped cream or ice cream.
  7. Leftovers refrigerate and re-heat well.
 Printable Recipe

StumbleUpon.com

Monday, June 14, 2010

Merveille de Piemonte Beans with Sesame Dressing

Merveille de Piemonte beans are so beautiful it seems wrong to cook them.  Sadly, no matter what we've tried, they quickly loose their gorgeous purple speckles.  Blanching, sauteing, every approach leads to the same monochrome beans within seconds.  What survives, though, is the beautiful buttery yellow color that is hidden from view by those purple splotches.  So while the cooked beans are not quite as striking, they still look fantastic on a plate.  And, best of all, the taste is exceptional.
Snap beans are an excellent source of vitamins C, K and A as well as manganese, potassium and iron.  They also contain riboflavin, calcium, phosphorus, omega-3 fatty acids and niacin.  Snap beans are reputed to be good for colon health because of the beta-carotene and vitamin C they contain.

Merveille de Piemonte beans have a flat, bumpy shape like a Romano bean, with a dense, firm texture.  Fresh-picked from the garden, these beans have a rich, hearty flavor that should not be masked by strong spices or elaborate recipes.  Instead, a simple sesame dressing is ideal for these (now yellow) beans.
Snap Beans with Sesame Dressing

Ingredients
1         lb           snap beans, washed and trimmed
2        Tbs          olive oil
1        tsp           toasted sesame oil
1        Tbs          rice wine vinegar
1        tsp           Dijon mustard
1/2     tsp           sea salt
1/4     tsp           black pepper
2        Tbs          sesame seeds, toasted
                        chopped cilantro or parsley for garnish

Procedure
  1. Bring a big pot of water to a boil, add generous amount of salt, then add beans.  Cook until just tender, about 5 minutes, then drain and run under cold water to stop the cooking process.
  2. Combine remaining ingredients (except sesame seeds), then toss with the beans.  Sprinkle seeds on top.

StumbleUpon.com

Tuesday, June 1, 2010

Get Growing in June

Get Growing

Welcome to our seventh Get Growing entry. This series will span 12 months, and is designed to help aspiring vegetable gardeners get out of the kitchen and into the garden. On the first of each month, we will discuss one garden project for the novice vegetable gardener. Because we are located in Houston, Texas, our growing conditions differ from many parts of the English-speaking world. To help guide gardeners in cooler climates, our Get Growing partner is Daphne of Daphne's Dandelions. Daphne gardens in Boston, and she will be providing monthly advice for Northern gardeners (although her excellent site is a wonderful resource for gardeners everywhere). This month, Daphne discusses fall transplants for the Northeast and fighting diseases.  Regardless of where you live, her advice is invaluable.

Vegetables that Love the June Heat

May was quite warm, with daily temperatures often hitting the high 90's.  There were a few days that offered relief thanks to overcast skies and rain, but now that it's June, we are guaranteed to have four months straight of serious heat.   There are many vegetables that we planted earlier in the year that will survive these temperatures, including melons, squash, and snap beans, but not many that should be started this month.  Some, including tomatoes, may survive but stop producing flowers and fruit until the temperatures cool off in the fall.  Others, especially the last of our fall vegetables, are quickly dying off.  There are a few vegetables, though, that love our summer weather.  These include eggplant, okra, basil, cowpeas, cucumbers and chile peppers.  If you haven't already started these vegetables, June is a good month to do so.  
Lima (Butter) Beans

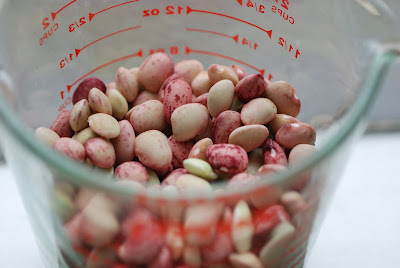
Another great crop to start now is lima beans, also known as butter beans.  These plants really love the heat, and seeds for bush beans can be planted as late as July in Zone 9.  Because pole lima beans, and in particular Christmas Lima Beans, take such a long time to mature, they really should be planted this month. 

If you're from the frozen and canned vegetable generation like we are, you probably think you hate lima beans, particularly that awful succotash combo we were all forced to eat that combined lima beans and corn for an amazingly flavorless, mushy and wholly unappealing dish.  Fresh lima beans, though, are a different matter entirely.  They are extremely rich and dense, with a distinct flavor that we love.

The fact that they are productive, easy to grow, highly nutritious, and versatile in the kitchen will further endear these beans to you.  There is only one drawback to growing lima beans, as opposed to snap beans, from our perspective.  This is the work involved in removing the edible beans from the pods.  We admit that this is not an enjoyable process, and can only recommend that you sit in front of the tv for distraction during this tedious chore.
Butter Bean Varieties 

When deciding whether to grow bush or pole lima beans, there are several factors to consider.  The first is how much time you have, both before you want to harvest the beans and before your weather will kill the plants.  Bush beans mature more quickly, making them an ideal choice if you want to pick limas in the next few months.  They're also a good choice if you're getting a late start, and have only a few months before cool weather starts.  Pole beans mature more slowly, but produce for a longer period of time.  Our pole beans were still loaded with pods when the first frost hit in late November.  They also produce more beans, and the beans tend to be larger.

A second consideration is how much space is available in your garden.  Pole beans take up less room because the plants grow vertically, but the vines become quite tall and full.  While pole limas are not an option for our front yard where we include only low-growing vegetables, bush limas are well-behaved and look quite attractive in our front border.  Remember that the harvest is not the pod itself, but the beans inside.  It takes A LOT of pods to get a pound of beans, so it's not worth growing limas if you only have room for a few plants.

A third consideration is taste.  Bush limas are smaller than pole limas, with a softer texture and delicate, buttery flavor.  These are the beans that earned lima beans the nickname butter beans.  Pole beans, though, are also wonderful with a hearty, nutty flavor.   

If you can't decide and have enough room in your garden, grow both types of limas.  The bush limas will provide an early, delicious harvest while the pole limas will produce pounds of beans over a long period of time.  Bush varieties that we recommend are Dixie Speckled Butterpea, Henderson's Bush and White Dixie Butter Baby Lima.  Our favorite pole varieties are Christmas and Florida Speckled.   This year, we're also trying two lima beans for the first time, Jackson Wonder Butterbean (bush) and White Christmas (pole). 


How to Grow Lima Beans

Because butter beans are a member of the legume family, try to plant them in a section of the garden that has not recently contained other legumes to avoid soil-borne diseases.  Seeds need warm temperatures in order to germinate, certainly not a problem in Zone 9 in June.  

Plant the seeds about an inch deep in a sunny part of the garden in soil with good drainage and lots of organic material.  If you have fresh, high-quality seeds, the germination rate will be excellent.  This means that almost all of the seeds will produce healthy, vigorous seedlings.  To avoid having to thin later, plant the seeds about 5 inches apart for bush beans and about four inches apart for pole beans.   If you end up with gaps where the seeds don't germinate, you can go back in and add new seeds to fill in the holes.  

For bush beans, we plant the rows quite close together to maximize production in our urban garden.  We leave just enough room to walk between rows while harvesting, about a foot and a half.  Plant pole beans at the back of the border to avoid blocking the sun from reaching your other plants.  If you don't already have poles or stakes in place for the pole beans, it is best to drive these into the soil at the same time that the seeds are started.
Keep the seeds well-watered until they germinate, then be sure to water frequently during hot, dry spells.  A thick layer of mulch is a good idea to conserve water and keep the soil evenly moist.  The plants will first produce flowers, then beans.  Bush beans will be the first to mature, in around two months.  Pole beans can take a lot longer, particularly the really big beans such as Christmas.  Do not give up hope if months go by without a single flower.  Eventually, you will be rewarded with a huge crop of gorgeous lima beans.  Of course, then the real work begins when you have to remove them all from their pods.
When to Harvest Butter Beans
Since butter beans are grown for the mature beans inside, it is important not to harvest too early.  If you do, inside will be a tiny, immature bean which is not much use in the kitchen.  Instead, wait until the pod looks plump and full, and you can see the shape of the rounded bean filling the pod.  Feel the pod too.  If there are no gaps between the seeds, they are probably ready for harvest.  Each pod typically contains two or three butter beans.
After harvesting, bring the beans inside and try to cook them within a day or two.  We prefer not to refrigerate our beans because it tends to diminish the flavor dramatically.  Just store them in a cool place in the kitchen.  Don't remove the beans from the pod until you want to cook with them.
How to Eat Butter Beans

In our opinion, these beans are best eaten when fresh.  They can, however, be dried and saved for later use.  Many vegetable gardeners just leave the pods on the plants to dry out.  But in Houston, our summers are so humid that the beans do not dry well if left outside.  In fact, they usually either start sprouting in the pod, or become molded and unusable.  If you live in a similar climate, bring them inside after harvesting, remove from the pods, and place them somewhere that gets good air circulation.  Try not to pile them on top of one another in a big bowl because they won't dry well.  instead, we spread them out on a plate in the kitchen where we enjoy watching the transformation as the beans dry.
Good for You and They Taste Good

Lima beans are an excellent source of dietary fiber, protein, folate, potassium and iron.  Just one cup of lima beans contains 14g of protein and over 50% of the daily recommended amount of vitamin C.   Limas also provide vitamins B6, K and niacin.

But don't worry that good nutrition means bad flavor.  Fresh butter beans are wonderful in pastas, rice dishes, salads and even pureed as a spread or dip.  They are familiar to anyone from the South, but are so versatile they can be used in any number of Indian, Italian, African or Asian recipes.  The problem for us has never been finding ways to use our harvest, but rather with harvesting enough to make anything at all.   Because the beans have to be removed from the pods, remember to harvest about 2 1/2 times the weight of the limas you'll need in the kitchen.  And, try to draft your kids, friends, neighbors, and anyone else you can find to help you shuck the beans.

Growing Edamame (Soybeans) 
Fall Transplants for the Northeast and Fighting Diseases

StumbleUpon.com

Wednesday, May 26, 2010

Curried Green Beans and Roasted Cauliflower with Cilantro Yogurt Sauce

One of the heirloom beans we are growing for the first time is Anellino di Trento.  We were initially drawn to the unusual crescent shape and speckled colors of this bush bean.  Sometimes known as Anellino Marmorizzato, this heirloom variety from Northern Italy is "marmorizzato" (marbled) in shades of green, purple and lavender, with a dense, firm texture and unusual, rich flavor.  The taste actually resembles that of a yardlong bean.  A pole version of Annellino, Stortino di Trento ("Curved from Trent"), is also available, but we have been quite pleased with both the productivity and taste of our bush beans.    Stortino di Trento, Anellino di Trento, and another heirloom bean, Sultan's Golden Crescent, are all beans referred to as "shrimp" beans because of their curved shape.

Anellino di Trento beans, with their unusually solid texture and distinct flavor, combine perfectly with roasted cauliflower to create an extremely hearty dish.   The vegetables are filling (and vegan) even without the yogurt sauce, but the sauce adds a nice zing thanks to fresh cilantro and spicy garlic.   These flavors play off the toasted Madras curry which seasons the vegetables to perfection.   If you are not growing Anellino di Trento beans, any green beans or even yardlong beans will work well in this recipe.   Be sure to select beans that are firm, not wrinkled or starting to dry out, with a bright color that indicates they are still fresh and full of flavor. 
Curried Green Beans and Roasted Cauliflower with Cilantro Yogurt Sauce
serves 2-4

Ingredients

Cilantro Yogurt Sauce

1            cup                non-fat Greek-style plain yogurt such as Fage
1            Tbs                fresh lemon juice
1/2          cup               cilantro, choped
1                                 garlic clove, minced

Curried Green Beans and Roasted Cauliflower

1             large             cauliflower head, cut into 1" florets
1                                 red onion, thinly sliced
1/4          cup               olive oil
1/2          lb                  green beans, cut into 2" pieces
1            Tbs                vegetable oil
2            slices             white sandwich bread, cubed
1            tsp                 Madras curry powder
                                   sea salt and black pepper

Procedure
 

Cilantro Yogurt Sauce
  1. Combine all ingredients.  Season with salt and pepper.  Set aside.
Curried Green Beans and Roasted Cauliflower
  1. Heat oven to 425°.  Combine cauliflower and onion with 3 Tbs olive oil.  Season with sea salt and black pepper, then spread in a single layer on a sheet pan.
  2. In same bowl, toss the beans with 1 Tbs olive oil and season with salt and pepper.  Spread beans on another sheet pan.
  3. Place both sheet pans in oven and roast until tender and lightly browned, stirring occasionally.  The beans will cook faster, about 14 minutes, than the cauliflower, about 18 minutes.  Remove from oven and combine.
  4. While vegetables are in the oven, heat 1 Tbs vegetable oil over low heat and saute bread cubes until golden and crispy, about 4 minutes.  Remove from pan to cool.
  5. In the same pan, toast the curry power over moderate heat, stirring constantly, until fragrant, about 2 minutes.  Scrape out of the pan and toss with the cooked vegetables until well coated.  Season the mixture with salt and pepper.
  6. Serve vegetables while still warm, topped with the bread cubes and yogurt cilantro sauce on the side.
Printable Recipe 

StumbleUpon.com