Showing posts with label Get Growing. Show all posts

Sunday, August 1, 2010

Get Growing in August

Get Growing


Welcome to our ninth Get Growing entry. This series will span 12 months, and is designed to help aspiring vegetable gardeners get out of the kitchen and into the garden. On the first of each month, we will discuss one garden project for the novice vegetable gardener. Because we are located in Houston, Texas, our growing conditions differ from many parts of the English-speaking world. To help guide gardeners in cooler climates, our Get Growing partner is Daphne of Daphne's Dandelions. Daphne gardens in Boston, and she will be providing monthly advice for Northern gardeners (although her excellent site is a wonderful resource for gardeners everywhere). This month, Daphne discusses preserving your vegetable harvest.  Regardless of where you live, her advice is invaluable.

Zone 9 in August

While many parts of the country view August as the last month of summer, here in Zone 9 summer usually stretches into late September or even October.  In fact, it's not uncommon to go trick-or-treating on October 31st in shorts and flip flops.  But August is a great month to start planning the fall vegetable garden.  

There are three components to the fall garden:  summer vegetables that have a second growing season in the fall; succession crops that grow year-round in Zone 9; and vegetables started in the fall for a spring harvest.

In the first category, the most popular summer vegetable to start for fall harvest is tomatoes.  In Zone 9, it gets too hot for tomatoes to flower or fruit during July and August.  Many of our plants are still alive, but we haven't seen a flower in months.  And, it's not a bad idea to replace those plants that didn't survive the heat with new seedlings.  Because the growing season can be short in the fall, choose varieties that are quick to mature.  And be emotionally prepared to lose these plants earlier than expected if there's an early frost.  The flip side is that there may be no frost, or only a mild frost, so these plants may survive for many months to come.

Other several warm weather vegetables that can be started now include snap beans, tomatoes and bush lima beans.  

August is also a good time to plant succession crops of plants that are dying back after a long summer of productivity.  We are planting new arugula, dandelion greens, and basil now.  Herbs in general are ideal to start now.  Cilantro, parsley and dill, all hate the extreme heat of July and August, but will do well all fall (and maybe even winter) if started now.


Another great project for August is to start sourcing seeds to start in September or October when it cools off which won't be harvested until next spring.  These vegetables will not grow much during the cool winter months, but as soon as the temperatures start warming up (usually in February), they will start maturing rapidly.


The list here is long, including carrots, fennel, radish, lettuce greens, collard greens, kale, Swiss chard, chicories, fava beans and chickpeas.  We have not had great luck with broccoli, cauliflower and Brussels sprouts in our garden, but if you want to give them a try, they need to be started in October or November.


It has been a long, hot summer.  We have spent as much time as possible indoors, and the garden has had to make do for days at a time.  Luckily, Houston has also had quite a bit of rain, so our plants are thriving despite the extreme neglect.   It is not easy to think about cool-weather crops right now, but if you do, you will be rewarded with an abundant vegetable harvest in the fall and again next spring.


StumbleUpon.com

Thursday, July 1, 2010

Get Growing in July

Get Growing


Welcome to our eighth Get Growing entry. This series will span 12 months, and is designed to help aspiring vegetable gardeners get out of the kitchen and into the garden. On the first of each month, we will discuss one garden project for the novice vegetable gardener. Because we are located in Houston, Texas, our growing conditions differ from many parts of the English-speaking world. To help guide gardeners in cooler climates, our Get Growing partner is Daphne of Daphne's Dandelions. Daphne gardens in Boston, and she will be providing monthly advice for Northern gardeners (although her excellent site is a wonderful resource for gardeners everywhere). This month, Daphne discusses insect control.  Regardless of where you live, her advice is invaluable.

 Zone 9 in July


July and August are the hottest months here in Houston.  Daily average temperatures top 95° and the low is rarely below 70°.  It takes a hurricane or tropical storm, like Hurricane Alex that is fast approaching Texas, to cool things off here.  This extreme heat is hard on most vegetable plants with a few notable exceptions.  We've already recommended eggplant and lima beans, both of which are thriving in our garden right now.  Another vegetable that loves our July weather is chile peppers.

Chile peppers are in the eggplant and tomato family, and are highly productive when it heats up outside.  We have had excellent results with Anaheim (above) and Jalapeno (below) as well as Cayenne, Poblano, and Serrano chiles.  The plants need little care or attention, and will produce small flowers that are attractive in the garden.  In fact, ornamental pepper plants are quite popular here in Houston even though the fruits are inedible.  Why not grow the real thing instead?


Pepper plants are easy to start from seed.  The seeds are quite small, so we prefer to start these in pots rather than direct sowing.  Transplant when the seedlings have four or more leaves, keeping well watered before and after transplanting.  Try to shade transplants during the hottest part of the day to avoid scalding and killing the plants.  And don't go overboard with seedlings.  Only a few plants are enough for the whole family because the plants are quite productive, and fresh chiles are extremely potent.   If you haven't already started your seedlings, it's not too late, although next year we suggest you get an earlier start.  We've been harvesting peppers for months.
Chile peppers can be used in any number of tacos, quesadillas and salsas.  We often use them to season pasta and vegetable dishes as well.  And any extra peppers are easy to dry and save for later.  
We were still using dried cayenne peppers from last summer almost a year later.  We dry ours indoors because the humid weather here tends to rot everything that is left outside.  In more arid climates, it is recommended that the peppers be left to hang outside in a sheltered spot until dry.

Growing Lima Beans

StumbleUpon.com

Tuesday, June 1, 2010

Get Growing in June

Get Growing

Welcome to our seventh Get Growing entry. This series will span 12 months, and is designed to help aspiring vegetable gardeners get out of the kitchen and into the garden. On the first of each month, we will discuss one garden project for the novice vegetable gardener. Because we are located in Houston, Texas, our growing conditions differ from many parts of the English-speaking world. To help guide gardeners in cooler climates, our Get Growing partner is Daphne of Daphne's Dandelions. Daphne gardens in Boston, and she will be providing monthly advice for Northern gardeners (although her excellent site is a wonderful resource for gardeners everywhere). This month, Daphne discusses fall transplants for the Northeast and fighting diseases.  Regardless of where you live, her advice is invaluable.

Vegetables that Love the June Heat

May was quite warm, with daily temperatures often hitting the high 90's.  There were a few days that offered relief thanks to overcast skies and rain, but now that it's June, we are guaranteed to have four months straight of serious heat.   There are many vegetables that we planted earlier in the year that will survive these temperatures, including melons, squash, and snap beans, but not many that should be started this month.  Some, including tomatoes, may survive but stop producing flowers and fruit until the temperatures cool off in the fall.  Others, especially the last of our fall vegetables, are quickly dying off.  There are a few vegetables, though, that love our summer weather.  These include eggplant, okra, basil, cowpeas, cucumbers and chile peppers.  If you haven't already started these vegetables, June is a good month to do so.  
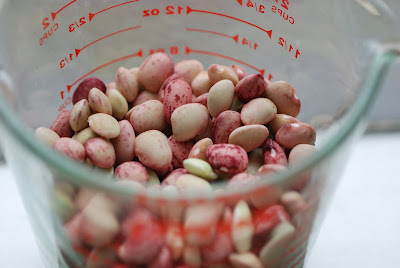
Lima (Butter) Beans

Another great crop to start now is lima beans, also known as butter beans.  These plants really love the heat, and seeds for bush beans can be planted as late as July in Zone 9.  Because pole lima beans, and in particular Christmas Lima Beans, take such a long time to mature, they really should be planted this month. 

If you're from the frozen and canned vegetable generation like we are, you probably think you hate lima beans, particularly that awful succotash combo we were all forced to eat that combined lima beans and corn for an amazingly flavorless, mushy and wholly unappealing dish.  Fresh lima beans, though, are a different matter entirely.  They are extremely rich and dense, with a distinct flavor that we love.

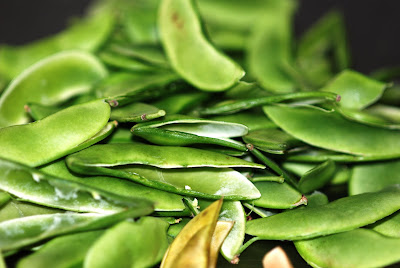
The fact that they are productive, easy to grow, highly nutritious, and versatile in the kitchen will further endear these beans to you.  There is only one drawback to growing lima beans, as opposed to snap beans, from our perspective.  This is the work involved in removing the edible beans from the pods.  We admit that this is not an enjoyable process, and can only recommend that you sit in front of the tv for distraction during this tedious chore.
Butter Bean Varieties 

When deciding whether to grow bush or pole lima beans, there are several factors to consider.  The first is how much time you have, both before you want to harvest the beans and before your weather will kill the plants.  Bush beans mature more quickly, making them an ideal choice if you want to pick limas in the next few months.  They're also a good choice if you're getting a late start, and have only a few months before cool weather starts.  Pole beans mature more slowly, but produce for a longer period of time.  Our pole beans were still loaded with pods when the first frost hit in late November.  They also produce more beans, and the beans tend to be larger.

A second consideration is how much space is available in your garden.  Pole beans take up less room because the plants grow vertically, but the vines become quite tall and full.  While pole limas are not an option for our front yard where we include only low-growing vegetables, bush limas are well-behaved and look quite attractive in our front border.  Remember that the harvest is not the pod itself, but the beans inside.  It takes A LOT of pods to get a pound of beans, so it's not worth growing limas if you only have room for a few plants.

A third consideration is taste.  Bush limas are smaller than pole limas, with a softer texture and delicate, buttery flavor.  These are the beans that earned lima beans the nickname butter beans.  Pole beans, though, are also wonderful with a hearty, nutty flavor.   

If you can't decide and have enough room in your garden, grow both types of limas.  The bush limas will provide an early, delicious harvest while the pole limas will produce pounds of beans over a long period of time.  Bush varieties that we recommend are Dixie Speckled Butterpea, Henderson's Bush and White Dixie Butter Baby Lima.  Our favorite pole varieties are Christmas and Florida Speckled.   This year, we're also trying two lima beans for the first time, Jackson Wonder Butterbean (bush) and White Christmas (pole). 


How to Grow Lima Beans

Because butter beans are a member of the legume family, try to plant them in a section of the garden that has not recently contained other legumes to avoid soil-borne diseases.  Seeds need warm temperatures in order to germinate, certainly not a problem in Zone 9 in June.  

Plant the seeds about an inch deep in a sunny part of the garden in soil with good drainage and lots of organic material.  If you have fresh, high-quality seeds, the germination rate will be excellent.  This means that almost all of the seeds will produce healthy, vigorous seedlings.  To avoid having to thin later, plant the seeds about 5 inches apart for bush beans and about four inches apart for pole beans.   If you end up with gaps where the seeds don't germinate, you can go back in and add new seeds to fill in the holes.  

For bush beans, we plant the rows quite close together to maximize production in our urban garden.  We leave just enough room to walk between rows while harvesting, about a foot and a half.  Plant pole beans at the back of the border to avoid blocking the sun from reaching your other plants.  If you don't already have poles or stakes in place for the pole beans, it is best to drive these into the soil at the same time that the seeds are started.
Keep the seeds well-watered until they germinate, then be sure to water frequently during hot, dry spells.  A thick layer of mulch is a good idea to conserve water and keep the soil evenly moist.  The plants will first produce flowers, then beans.  Bush beans will be the first to mature, in around two months.  Pole beans can take a lot longer, particularly the really big beans such as Christmas.  Do not give up hope if months go by without a single flower.  Eventually, you will be rewarded with a huge crop of gorgeous lima beans.  Of course, then the real work begins when you have to remove them all from their pods.
When to Harvest Butter Beans
Since butter beans are grown for the mature beans inside, it is important not to harvest too early.  If you do, inside will be a tiny, immature bean which is not much use in the kitchen.  Instead, wait until the pod looks plump and full, and you can see the shape of the rounded bean filling the pod.  Feel the pod too.  If there are no gaps between the seeds, they are probably ready for harvest.  Each pod typically contains two or three butter beans.
After harvesting, bring the beans inside and try to cook them within a day or two.  We prefer not to refrigerate our beans because it tends to diminish the flavor dramatically.  Just store them in a cool place in the kitchen.  Don't remove the beans from the pod until you want to cook with them.
How to Eat Butter Beans

In our opinion, these beans are best eaten when fresh.  They can, however, be dried and saved for later use.  Many vegetable gardeners just leave the pods on the plants to dry out.  But in Houston, our summers are so humid that the beans do not dry well if left outside.  In fact, they usually either start sprouting in the pod, or become molded and unusable.  If you live in a similar climate, bring them inside after harvesting, remove from the pods, and place them somewhere that gets good air circulation.  Try not to pile them on top of one another in a big bowl because they won't dry well.  instead, we spread them out on a plate in the kitchen where we enjoy watching the transformation as the beans dry.
Good for You and They Taste Good

Lima beans are an excellent source of dietary fiber, protein, folate, potassium and iron.  Just one cup of lima beans contains 14g of protein and over 50% of the daily recommended amount of vitamin C.   Limas also provide vitamins B6, K and niacin.

But don't worry that good nutrition means bad flavor.  Fresh butter beans are wonderful in pastas, rice dishes, salads and even pureed as a spread or dip.  They are familiar to anyone from the South, but are so versatile they can be used in any number of Indian, Italian, African or Asian recipes.  The problem for us has never been finding ways to use our harvest, but rather with harvesting enough to make anything at all.   Because the beans have to be removed from the pods, remember to harvest about 2 1/2 times the weight of the limas you'll need in the kitchen.  And, try to draft your kids, friends, neighbors, and anyone else you can find to help you shuck the beans.

Growing Edamame (Soybeans) 
Fall Transplants for the Northeast and Fighting Diseases

StumbleUpon.com

Saturday, May 1, 2010

Get Growing in May

Get Growing

Welcome to our sixth Get Growing entry. This series will span 12 months, and is designed to help aspiring vegetable gardeners get out of the kitchen and into the garden. On the first of each month, we will discuss one garden project for the novice vegetable gardener. Because we are located in Houston, Texas, our growing conditions differ from many parts of the English-speaking world. To help guide gardeners in cooler climates, our Get Growing partner is Daphne of Daphne's Dandelions. Daphne gardens in Boston, and she will be providing monthly advice for Northern gardeners (although her excellent site is a wonderful resource for gardeners everywhere). For Get Growing in May, Daphne discusses starting summer vegetables and growing tomatoes.  Regardless of where you live, her advice is invaluable.

Zone 9 in May

In Zone 9, the temperatures start heating up in May.  Here in Houston, the average highs for May are over 90° and it won't start to cool off until October.  While most of our fall vegetables are on the way to the compost pile, our favorite summer vegetables are thriving right now.  This includes tomatoes, eggplant, basil and chile peppers.   Our snap bean plants are loaded with flowers and tiny beans, and the cucumbers and melons are filling in.  Seeds that can be started this month include succession crops of snap and pole beans, arugula and other year-round greens such as mizuna and senposai, and cucumbers.  Sweet potatoes, lima beans, winter squash, melons and corn can also be started in May.
Growing Edamame (Soybeans)

Another crop to consider for your Zone 9 garden is edamame or soybeans.  These plants love the heat, are low-maintenance, and extremely productive.  Edamame are in the legume family, which means the plants improve the soil, a significant benefit for an organic vegetable garden.  In fact, soybeans are so beneficial that many organic growers plant soybeans as a green manure to add nutrients and organic matter in the off-season. This makes soybeans an excellent choice to grow alongside heavy feeders such as corn and tomatoes that are part of the summer vegetable garden.

Growing soybeans could not be easier.  The seeds are large and forgiving, and should be planted an inch or so deep in full sun.  Plant about 6 inches apart in rows, and be prepared to stake the plants depending on the variety you select. 
Our favorite soybean is "Moon Cake" from Southern Exposure.  These plants grow over three feet tall, and eventually need support, especially when loaded with pods.   The beans are extremely tasty, and many of the pods include three big, fat soybeans making for an abundant harvest.

For more exotic soybeans, try "Black Jet" from Johnny's, a black soybean that matures early, is extremely productive, and loaded with flavor.  Another great choice is "Kouri" from Kitazawa, a brown-seeded soybean that is prized in Japan for its sweet, nutty flavor.  We're growing both of these edamame varieties for the first time this year, so check back for reports as our plants mature.

Why Grow Edamame

Edamame are not only good for the garden, but also one of the super foods that should be a part of any healthy diet.  Soybeans are a complete protein, containing all the essential amino acids.  They are rich in omega-3 fat, calcium, iron, folate, B-vitamins, and isoflavones (which are found only in soy).   They are also an extremely versatile vegetable in the kitchen; while they are prominently featured in many Asian recipes, edamame work in most recipes calling for peas, beans, chickpeas or limas.

Soybeans are readily available frozen, either shelled or in their pods, but it is not easy to find fresh soybeans at the market.  Freshly picked soybeans are reputed to be the healthiest option, and, like most organic vegetables fresh from the garden, the taste is far superior.  In Japan, fresh edamame are considered such a delicacy that they are eaten raw, straight from the pod.  Our fresh edamame were so delicious last summer that our 9-year old became passionate about growing, harvesting and eating soybeans.  Thanks to him, we couldn't grow enough to keep up with demand in our household.  Add in how easy they are to grow, their versatility in the kitchen, the significant health benefits of eating soybeans, the fact that these plants love our Zone 9 blistering heat, and the soil benefits of growing soybeans, and you'll see why we love edamame for the summer vegetable garden.

Other Posts in the Get Growing Series

Determining Your Gardening Zone and Growing Peas
Garden Planning, Planting Methods and Seed Selection
Growing Lettuce
Starting Seeds Indoors
Growing Tomatoes
Compost:  What is It, How to Make it, How to Use It
Growing Snap Beans
Spinach, Row Covers and Peas
Growing Eggplant
Growing Brassicas

StumbleUpon.com

Thursday, April 1, 2010

Get Growing In April

Get Growing

Welcome to our fifth Get Growing entry. This series will span 12 months, and is designed to help aspiring vegetable gardeners get out of the kitchen and into the garden. On the first of each month, we will discuss one garden project for the novice vegetable gardener. Because we are located in Houston, Texas, our growing conditions differ from many parts of the English-speaking world. To help guide gardeners in cooler climates, our Get Growing partner is Daphne of Daphne's Dandelions. Daphne gardens in Boston, and she will be providing monthly advice for Northern gardeners (although her excellent site is a wonderful resource for gardeners everywhere). For Get Growing in April, Daphne discusses growing brassicas.  Regardless of where you live, her advice is invaluable.

A BIG Seed Giveaway

We are very excited to offer a giveaway this month sponsored by Hometown Seeds.  We will select one winner from our site, and Daphne will also select one winner.  The prize is an amazing assortment of vegetable seeds from Hometown's Survival Seed collection, a total of sixteen packages of vegetable seeds ranging from beets and pole beans to butternut squash, cucumber, zucchini and sweet peppers.  The winner will receive almost a pound and a half of seeds, specially packaged to keep a minimum of 5 years. All the vegetable varieties are non-hybrids which is wonderful if you like to collect and save seeds.  

To qualify, you must live in the continental U.S. and you must post a comment here at any time between now and April 15th and mention the Hometown giveaway.  You may also send an email directly to vegmatter@gmail.com.  If you post a comment, please enable us to reply so we can retrieve your details if you are the winner.  Seeds will be shipped directly to the winner from Hometown Seeds later this month.
Get Growing in April

April is a great time to start eggplant seeds in Zone 9.  Eggplants are part of the solanum, or nightshade, family which also includes tomatoes, sweet and chile peppers, and tomatillos.  These plants all love the heat, making them well suited to our hot, humid climate.  You'll find that many vegetable plants sputter out when our long summer drags on, but eggplants remain extremely productive during even the hottest summer months.  In fact, eggplants started now should produce constantly from June through the first hard frost (which occurred last year in late November).   That's six months of harvesting pounds and pounds of eggplants, enough to fatigue even the most ardent eggplant lover by the end of the growing season. 
 
How to Grow Eggplants

Eggplants are easy to start from seed.  See our sidebar for our favorite seed suppliers.  We prefer to start our seeds in pots, but direct sowing is also fine.  The seeds are fairly small, so don't plant too deeply.  Keep moist until germination, and then be sure to protect the seedlings from any late frost.  Temperatures must be warm for the seeds to germinate, so you may consider starting seeds indoors if the ambient temperature is still chilly in your area.  Here in Houston we're already hitting the high 70's and low 80's during the day making it perfect eggplant-starting weather.

Grow your eggplants in full sun in rich, fertile soil, and plant in a section of the garden that did not include solanum species last year to prevent the spread of disease.  Because eggplants have a long growing season in Zone 9, the plants will become quite full and tall.  Leave adequate space in between seedlings to accommodate this growth.

We are a bit eggplant crazy in our family and have grown as many as 24 plants at one time, but realistically, just a few plants will supply enough eggplants for a family of four throughout the summer.   The plants should not have any significant pest problems, but keep an eye out for leaf footed bugs which like to congregate on the fruits.

Eggplant plants are quite attractive in the garden, with small purple flowers that are extremely ornamental.  Once the fruits appear, they add extra beauty and color to the plants.  For this reason, eggplants can easily be included in a flower border.  Just be sure they're planted somewhere that receives a full day of sun, and grow the plants somewhere that is easy to access for harvesting.
Eggplant Varieties

Part of the reason for our excess when it comes to growing eggplants is the amazing variety available.  Green, lavender, orange, white, purple, variegated.  Long, round, oval, and bite-sized.  It is truly hard to select just one type of eggplant to grow.  In fact, last summer we grew 12 varieties, admittedly a bit much.  But, we have a few favorites that we are happy to recommend: 
  • Thai Long Green -- this is our hands-down favorite.  It is an Asian-style eggplant, with few seeds and a dense texture that cooks beautifully.  The plants are highly productive, and the long bright green eggplants are gorgeous.  These eggplants are tasty when picked while small, or when they reach maturity at 8 inches or more.  The only drawback is that this variety is a hybrid, which means that you cannot collect and save seeds.
 
  • Cloud Nine -- this is the most prolific eggplant we have grown.  In fact, it became almost impossible to keep up with the never-ending supply produced by just 3 plants.  The small white fruits glow in the summer garden, making for an attractive and easy harvest.  If you wait too long, the fruits turn bright yellow.  At this point, they are full of seeds and not particularly tasty, but the color is wonderful.  This is another hybrid variety not suitable for seed collection.
 
  • Rotunda Bianca Sfumata di Rosa -- the prettiest eggplant we grow.  This is a round, Italian-style eggplant in amazing shades of purple, white and lavender.  The fruits are so big and heavy, staking the plants is a good idea or your plants will start growing horizontally as the fruits weigh down the branches.  This is an heirloom variety, great if you like to collect and save seeds.
 
  • Thai Hybrid Tiger -- this is a bite-sized eggplant that matures to the size of a golf ball.  Covered in green and white stripes, these are extremely ornamental in the garden before harvesting.  They can be sliced like other eggplant varieties, cooked whole, or stuffed.  As the name suggests, this is a hybrid variety.
Other varieties we have successfully grown include Ichiban, Black Beauty, Rosa Bianca, Green Doll and Pingtung.  Both Ichiban (long Asian-style) and Black Beauty (Italian style) are especially excellent producers of delicious eggplants.  This year, we are growing several varieties new to us including Antigua, Fairy Tale, Money Maker and Ma-Zu Purple.  Check back in June for our results with these varieties.


Pollination to Increase Production

Eggplants have "perfect" flowers.  This means that there are no female and male flowers to mess with, making the job for pollinators such as butterflies and bees fairly easy work.  But we have found that eggplants respond particularly well to hand pollination, and productivity is dramatically increased.   In addition, eggplant flowers are large enough to make this an easy and quick task.  When your plants start flowering, you should read all about hand pollination.
What to do with Eggplants

When you see just how productive eggplants are in Zone 9, you will understand why eggplant recipes are so popular in regions with climates similar to ours.  Grab any Middle Eastern, Italian, Indian or Chinese cookbook and you'll find a long list of recipes in the index  under "eggplant".  Eggplant is also popular in many French, Turkish, Thai and Vietnamese dishes to name just a few.  

Eggplants are best when used soon after harvest, so don't pick them only to store in your refrigerator for a week.  You can harvest your eggplants at any time from quite small to fully mature.  Baby eggplants are actually wonderfully delicate and delicious.  Harvest often to keep up your plants' productivity even if you're not dying to eat yet another eggplant dish.  You'll have no problem finding grateful recipients if (and when) you are harvesting more eggplants than you can possibly eat.

Other Posts in the Get Growing Series

Determining Your Gardening Zone and Growing Peas
Garden Planning, Planting Methods and Seed Selection
Growing Lettuce
Starting Seeds Indoors
Growing Tomatoes
Compost:  What is It, How to Make it, How to Use It
Growing Snap Beans
Spinach, Row Covers and Peas

StumbleUpon.com

Monday, March 1, 2010

Get Growing in March

The Get Growing Series

Welcome to our fourth Get Growing entry. This series will span 12 months, and is designed to help aspiring vegetable gardeners get out of the kitchen and into the garden. On the first of each month, we will discuss one garden project for the novice vegetable gardener. Because we are located in Houston, Texas, our growing conditions differ from many parts of the English-speaking world. To help guide gardeners in cooler climates, our Get Growing partner is Daphne of Daphne's Dandelions. Daphne gardens in Boston, and she will be providing monthly advice for Northern gardeners (although her excellent site is a wonderful resource for gardeners everywhere). For Get Growing in March, Daphne discusses spinach, as well as row covers and peas.  Regardless of where you live, her advice is invaluable.


Get Growing in March, Zone 9

Here in Houston we have had an unusually cold winter with several hard frosts and lots of chilly days.  We even had a real snow for the first time since we moved to Houston in 1996.  It was exciting for our kids, but our summer vegetables weren't so happy.  While we were still harvesting eggplant, basil and tomatoes as late as November to the envy of many northern gardeners, none of those plants survived the unusually cold December and January weather.

So March is a re-building month, a time to start seeds for many of those summer vegetables that succumbed to the cold winter weather.  This month, assuming the temperatures stay above freezing, some of the vegetable seeds you can start in Zone 9 are:

  • Arugula
  • Beans (Snap, and later in the month Yard-Long and Lima)
  • Chile Peppers
  • Cucumber
  • Parsley
  • Mint
  • Sage
  • Sweet Pepper
  • Tomato
  • Tomatillo
  • Watermelon

Some of those vegetables, including arugula, mint, parsley and sage, survived our winter weather. Now is the time to plant succession crops.  Others, such as cucumber and chile peppers, require warm weather to thrive, so keep an eye on your local weather to determine when it's safe to plant.  Starting your seeds in pots makes your seedlings portable in the event of a late frost.

Why Snap Beans

Inspiration for this series came from the many envious emails we received from fellow cooks who hadn't yet ventured into the garden. For those of you who have a fear of the garden, beans are a great place to start.
Last month, our older son did a science fair experiment growing snap bean seeds using different liquids -- coke, orange juice, milk and water.  Surprisingly (at least to us), the milk seedlings did extremely well although they made our house smell like we had a dead body stashed in the kitchen.  Even the seeds given only coke germinated and grew.  So, if even a 9-year old can grow beans, and they'll grow with crazy liquids like milk and coke, anyone with a yard can grow snap beans
.
Bush vs. Pole Beans

You can select either bush beans or pole beans.  The advantage of bush beans (see picture above) is two-fold:  the plants do not require staking and they produce more quickly than pole beans.  A major advantage of pole beans is that they produce for a longer period of time, so the total harvest is greater.   Also, since pole beans grow vertically, they're an excellent choice for a small garden where you want to squeeze in a lot of plants.

In terms of flavor, we have had wonderful results with both types of beans.  Our favorite bush bean is Royal Burgundy, and our favorite pole bean is Cosse Violette (below).  The purple color of both beans makes for an easy harvest because it's easy to see the beans, plus both have outstanding flavor and the beans are especially beautiful (although they lose their purple color when cooked).


Last year, we had Royal Burgundy beans six weeks after starting the seeds and harvested beans for the next month.  The Cosse Violette took almost three months to start producing, but we then harvested until the cold weather killed the plants two months later.  Another snap bean we love is Burpee's Stringless Green Pod, a green bush bean that is extremely productive.  If you don't feel like ordering from a seed catalog, you can pick these up at Home Depot.

How to Grow Snap Beans

Like peas and other legumes, snap beans are nitrogen fixers.  This means that the plants will actually improve the soil, making them an excellent vegetable to grow before using the same section of the garden for a crop that is a heavy feeder.  The planting instructions are really simple (so simple, our nine year old did this on his own).
  1. Choose a nice, sunny spot for your beans.  If you are growing pole beans, plant at the back of your border because the plants will become quite tall, and drive in bamboo poles or other supports for your plants.
  2. Make sure the soil is friable enough for the seedlings to penetrate after germination.  In other words, make sure the soil is not so compacted that nothing can grow.  And if you have heavy clay soil, amend with compost to loosen before starting the seeds.
  3. Plant according to the package directions, which is usually about 1 inch deep.  Bean seeds are so big, we don't bother to make holes for the seeds first.  Instead, we just press them into the soil at regular intervals, about 6 inches apart.  You can plant pole beans closer together than bush beans because they will grow up instead of becoming low and full.  We plant our pole bean seeds about 3" apart.
  4. Keep the soil watered until germination.  You shouldn't need to amend the soil, but may need to water occasionally if it gets extremely hot and dry.
  5. We have not had serious pest problems with our bean plants.  There is a butterfly, the long-tailed skipper, that likes to lay eggs on these plants, but the caterpillars are fairly well behaved and eat only the leaves of the plants, not the bean pods.  You can easily pluck off the eggs and caterpillars when you see them.
  6. The plants will flower, and each flower that is pollinated will become a bean.  Beans have "perfect" flowers, making for a high pollination rate.  We are firm believers in hand-pollination for vegetables such as eggplant and cucumber, but we've never bothered with the beans.  They'll produce like crazy without any help.
  7. The beans start out as a tiny, fully formed bean.  They then lengthen and thicken until maturity.  You want to harvest when the beans are about the width of a pencil and before the pod gets lumpy.  If you wait too long, they won't taste as good (but they are certainly still edible).
  8. Plant succession crops (new seeds) every three or four weeks to keep your harvest going all summer.
  9. In Zone 9, you should be able to grow and harvest beans from April through late autumn.
There are millions of ways to prepare snap beans.  For the simplest, most perfect way to cook beans fresh from the garden, here's our recipe for Beans a la Francaise.  You can find lots of other bean recipes here on our site.  If you have questions, we're always happy to help.  Just drop us an email.

Other posts in the Get Growing Series


Determining Your Garden Zone and Growing Peas
Garden Planning, Planting Methods, and Seed Selection
Growing Lettuce
Starting Seeds Indoors
Growing Tomatoes
Compost:  What Is It, How to Make It, How to Use It
Spinach, Row Covers and Peas

StumbleUpon.com

Monday, February 1, 2010

Get Growing in February

The Get Growing Series

Welcome to our third Get Growing entry. This series will span 12 months, and is designed to help aspiring vegetable gardeners get out of the kitchen and into the garden. On the first of each month, we will discuss one garden project for the novice vegetable gardener. Because we are located in Houston, Texas, our growing conditions differ from many parts of the English-speaking world. To help guide gardeners in cooler climates, our Get Growing partner is Daphne of Daphne's Dandelions. Daphne gardens in Boston, and she will be providing monthly advice for Northern gardeners (although her excellent site is a wonderful resource for gardeners everywhere). For Get Growing in February, Daphne discusses compost:  what it is, how to make it, and how to use it  Regardless of where you live, her advice is invaluable.

Starting Tomatoes in February

February 15th is the average last frost date for Houston.  This means that there are many summer vegetable seeds we can start in February, but please first read our words of caution about "average" last frost dates.  You will need to be prepared to protect your seedlings from an unseasonable frost which means using insulators or covers, or keeping your seedlings in pots so they can be brought inside if necessary.

Tomatoes are one of those vegetables that everyone stresses about growing.  There are diseases and insects to worry about, birds will attach your fruit just before it's ready to pick, intense rains may cause blossom-end rot, and our hot weather will stop fruit production early in the summer.   With all these issues, we debated about presenting tomatoes as this month's gardening project.  But home-grown tomatoes are so far superior to what is available for purchase, we think it's worth the challenge.  And, we're going to try to keep it very simple for the novice gardener so that you're guaranteed to succeed.

Why start tomato seeds now when there's still a risk of a late frost?

Tomato fruit tends to set in a fairly narrow temperature window, and once it gets too hot (night time temperatures over 75° or day time temperatures over 92°), your plants may not produce fruit.   In Houston, that can happen as early as June, so the idea of tomatoes as a "summer" vegetable doesn't work in Zone 9.  Higher temperatures also make tomato plants more susceptible to disease and insects.  If you wait until tomato transplants start showing up at the garden center in April or May, your plants don't have much chance of success.   Starting your seeds now is a bit of a gamble, but if you start them in pots (which we recommend), you can bring them indoors if we get a late frost.  And, starting with seeds instead of plants has a few benefits:
  • you can select from thousands of varieties
  • buying seeds is much cheaper than purchasing plants
  • you can start your plants much earlier
  • you will know your plants are healthy, organic and disease-free
  • you will know what you're growing (we have purchase mis-labeled plants more than once, ending up with a huge red tomato that was supposed to be a yellow cherry tomato, for example)

Preparing the garden

  • First, select a spot that gets full sun.  We grow our tomatoes along our driveway in a section of the garden that faces south and gets sun from morning until late in the day.  
  • Tomato plants need fertile soil, and the easiest way to provide this is to prepare your soil ahead of time.  We have been saving bags of leaves, pine needles and grass clippings all winter, and we simply add these to the soil ahead of time.  If you have a compost pile, amend generously now.   If you start with fertile soil, your plants should thrive without much intervention later in the season.
  • If you experience heavy rains like we do in Houston, a raised bed is not a bad idea.   
  • Because tomatoes can be susceptible to soil-bourne diseases, try to select a spot where you have not recently grown tomatoes.  Some suggest selecting a spot where no solonocae (eggplants, peppers, etc) have recently grown.
  • Plan to mulch heavily around your tomato plants.
Choosing your tomato varieties
If you are a novice tomato grower, focus on cherry tomatoes.  These tomatoes are much easier to grow in in Zone 9, and you will be rewarded with heavy production for a long period, even in the hottest months, if you grow these small tomatoes.  Two of our favorite varieties are Yellow Pear (above) and Matt's Wild Cherry (below).   Standard tomatoes are much fussier and challenging, but the pay-off is amazing.  If you want to also grow a full-size tomato, select one that suits your preferences for flavor, size and color.  Our instructions below work for cherry or standard tomatoes.

Starting your seeds and Transplanting

We recommend that you start your seeds in grower pots.  If you start with good seeds (see our sidebar for some of our favorite seed suppliers), tomatoes have an excellent germination rate, so you don't need to start thousands of seeds.  Keep the seedlings watered and make sure they get lots of light so they don't become too leggy.  Once they have developed three or four sets of leaves, pinch off the bottom leaves and transplant into the garden.  Plant so that the spot where you pinched the leaves is BELOW the soil level.  Roots will develop here, producing a plant with extensive, deep roots that will help protect the plant from our summer heat.
Drive a stake into the ground when you transplant the seedling, and gently secure the seedling to the stake. We use bamboo from our garden and recycled twist ties for this.

 If you plan to use cages, select a sturdy one, and place it in the ground when you transplant the seedlings.  If you wait until the seedling grows into a large plant first, you risk seriously damaging the plant when you try to squeeze it into the cage.

Seedling care

Tomatoes like consistent water, although not too much.  Here in Houston we have sudden, intense rain storms which make that difficult.  Our advise is to not stress about what you can't control, and just water your seedlings at regular intervals if there is no rain.  Mulch will help keep the soil evenly moist.   If you started with fertile soil, you should not need to amend during the growing season.

As the seedlings develop, they will form suckers.  You can read our post on suckers and their removal, and how to convert suckers into new seedlings to share with friends and family.

Fruit Production
Tomatoes have "perfect" flowers which means there are no male and female flowers.   This generally means easier fruit production, but if you don't want to take any chances, you can always hand-pollinate your plants.  This is extremely easy, and one of the few gardening projects that produces results in just a few days.  If you have the time, we highly recommend hand-pollination.

Fruit Harvest
Cherry tomatoes do not tend to have significant pest problems, so we leave them to fully ripen on the plant.  They taste amazing this way.  They grow in clusters, so you should be able to harvest several at one time. With full-size tomatoes, we have often waited one day too long only to find a big chunk taken our of our tomatoes by a bird, or to see cracks forming in the tomato skin.  We suggest harvesting your full-size tomatoes when they are close to mature, then letting them fully ripen in the safety of your kitchen.

Seed Collection

If you are growing an heirloom tomato variety (as opposed to a hybrid variety), you should collect seeds from your biggest and most beautiful fruit.  Since tomatoes have "perfect" flowers, there's little risk of cross-pollination even if you are growing more than one tomato variety.  This means your seeds will produce seedlings true to their variety as opposed to a combination of yellow pear and wild cherry.

Simply squeeze the seeds into a thin-meshed sieve, then rinse well with clean water.  Spread the seeds out on paper towels to dry, then store in an envelope or plastic bag for next year.  Be sure to label your seeds with the collection date and variety name.  In Zone 9, we start a second crop of tomatoes in the fall, so you may end up using these collected seeds later this year.

Organic Gardening
We don't use chemicals or pesticides in our garden.  We don't want to expose ourselves, our kids, and our neighbors to those chemicals.  Our garden has been organic since we purchased our house 14 years ago, and we have never had a pest problem with one exception, the squash vine borer, which wiped out our zucchini and squash plants last year.  The squash vine borer is the caterpillar of a moth which lays it's eggs on squash plants.

Similarly, tomatoes attract a moth which lays eggs that hatch into the tomato hornworm, a surprisingly beautiful caterpillar despite it's nasty ways.  We had a few hornworms last year, easy to spot when you notice plant stems that are missing all their leaves, but most were eliminated early on by garden predators.  We just picked off the few we discovered (and sent them to an early death).  They did not seriously interfere with our tomato fruit production, and are certainly not worth straying from your commitment to organic gardening.
Our natural predators include dragonflies and lady bugs (above) as well as birds, frogs, wasps, and assassin bugs.  Above is a wasp nest (made out of mud) with two pupa inside.  Unfortunately, this nest was built right above our kitchen door and the wasps got a little too aggressive every time we entered or left the house, so we knocked down the nest.  The wasps returned to the spot of the nest for several days before building a new one under our roof overhang.

Reading about Tomatoes

If we have sparked an urge to read and learn more about tomatoes, there are several excellent books that we recommend.   Smith and Hawken has published a nice guide to heirloom tomato varieties, and Amy Goldman's book on heirloom tomatoes is full of gorgeous pictures that will make it almost impossible for you to choose only one variety.  We also recommend Elioit Coleman and Edward Smith for good, basic tomato growing advice.  Online, Urban Harvest has several excellent articles and lots of useful advice for growing tomatoes and other vegetables in Houston (or similar climates).

Other posts in the Get Growing Series

StumbleUpon.com