Showing posts with label Tomatoes. Show all posts

Wednesday, June 23, 2010

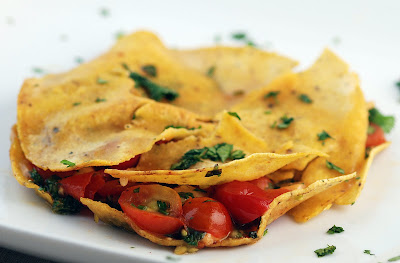
Cherry Tomato and Aged Gouda Quesadilla

Cherry tomatoes get no respect.  They're a throw-away item on every salad bar, and are often ignored at the grocery in favor of bigger varieties.  It doesn't help that store-bought cherry tomatoes are usually utterly lacking in flavor.  They are also admittedly difficult to work with for some recipes calling for slices of tomatoes or cooking tomatoes.
But for the gardener, cherry tomatoes are hard to beat.  The plants are highly productive even in our hottest weather when full-sized tomatoes are impossible to grow.  Cherry tomatoes are available in many varieties that resist both disease and insect attacks, and they ripen to perfection on the vine without splitting, rotting or dropping.   Available in several sizes and colors, some of our favorite varieties are "Matt's Wild Cherry" (the tiniest and sweetest cherry tomato we've grown), "Yellow Pear" (which produces a ridiculous number of beautiful yellow tear-drop shaped tomatoes) and "Sugary" (which is an unusual oblong shape and pretty pink color).

The key with cherry tomatoes is to take advantage of their strengths.  Don't try making a tomato sauce or ketchup.  Instead, include these little tomatoes in pastas, salads, or even sandwiches.  These tomatoes are naturally sweet and juicy, and require only minimal, if any, cooking.
Here, we include these little tomatoes in another of our garden quesadilla recipes.*  Toss with basil, cilantro and chives to make a quick filling.  Add an aged gouda that has lots of flavor, and these quesadillas come together in just a few minutes.   The results are delicious, especially with cherry tomatoes freshly picked from the garden.


Cherry Tomato and Gouda Quesadilla


Ingredients

2         cups           cherry tomatoes, cut in half
1/2      cup             aged gouda cheese, diced
1/4      cup             cilantro, chopped
2         Tbs             basil, chopped
2         Tbs             chives, chopped
                            sea salt and black pepper
4                           corn tortillas

Procedure

  1. Combine tomatoes, cheese, cilantro, basil and chives.  Season with salt and pepper.
  2. Sandwich half of the mixture in between 2 tortillas.  Repeat with remaining filling.
  3. Heat vegetable oil in saute pan over medium and heat quesadilla until tortilla is golden brown.  Flip and repeat.  Remove from heat and cook second quesadilla.  Serve immediately.
Printable Recipe

*Other Quesadilla recipes from Vegetable Matter:
Chinese Kale Quesadilla
Butternut Squash, Jalapeno and Feta Quesadilla
Swiss Chard and Queso Fresco Quesadilla

StumbleUpon.com

Monday, February 1, 2010

Get Growing in February

The Get Growing Series

Welcome to our third Get Growing entry. This series will span 12 months, and is designed to help aspiring vegetable gardeners get out of the kitchen and into the garden. On the first of each month, we will discuss one garden project for the novice vegetable gardener. Because we are located in Houston, Texas, our growing conditions differ from many parts of the English-speaking world. To help guide gardeners in cooler climates, our Get Growing partner is Daphne of Daphne's Dandelions. Daphne gardens in Boston, and she will be providing monthly advice for Northern gardeners (although her excellent site is a wonderful resource for gardeners everywhere). For Get Growing in February, Daphne discusses compost:  what it is, how to make it, and how to use it  Regardless of where you live, her advice is invaluable.

Starting Tomatoes in February

February 15th is the average last frost date for Houston.  This means that there are many summer vegetable seeds we can start in February, but please first read our words of caution about "average" last frost dates.  You will need to be prepared to protect your seedlings from an unseasonable frost which means using insulators or covers, or keeping your seedlings in pots so they can be brought inside if necessary.

Tomatoes are one of those vegetables that everyone stresses about growing.  There are diseases and insects to worry about, birds will attach your fruit just before it's ready to pick, intense rains may cause blossom-end rot, and our hot weather will stop fruit production early in the summer.   With all these issues, we debated about presenting tomatoes as this month's gardening project.  But home-grown tomatoes are so far superior to what is available for purchase, we think it's worth the challenge.  And, we're going to try to keep it very simple for the novice gardener so that you're guaranteed to succeed.

Why start tomato seeds now when there's still a risk of a late frost?

Tomato fruit tends to set in a fairly narrow temperature window, and once it gets too hot (night time temperatures over 75° or day time temperatures over 92°), your plants may not produce fruit.   In Houston, that can happen as early as June, so the idea of tomatoes as a "summer" vegetable doesn't work in Zone 9.  Higher temperatures also make tomato plants more susceptible to disease and insects.  If you wait until tomato transplants start showing up at the garden center in April or May, your plants don't have much chance of success.   Starting your seeds now is a bit of a gamble, but if you start them in pots (which we recommend), you can bring them indoors if we get a late frost.  And, starting with seeds instead of plants has a few benefits:
  • you can select from thousands of varieties
  • buying seeds is much cheaper than purchasing plants
  • you can start your plants much earlier
  • you will know your plants are healthy, organic and disease-free
  • you will know what you're growing (we have purchase mis-labeled plants more than once, ending up with a huge red tomato that was supposed to be a yellow cherry tomato, for example)

Preparing the garden

  • First, select a spot that gets full sun.  We grow our tomatoes along our driveway in a section of the garden that faces south and gets sun from morning until late in the day.  
  • Tomato plants need fertile soil, and the easiest way to provide this is to prepare your soil ahead of time.  We have been saving bags of leaves, pine needles and grass clippings all winter, and we simply add these to the soil ahead of time.  If you have a compost pile, amend generously now.   If you start with fertile soil, your plants should thrive without much intervention later in the season.
  • If you experience heavy rains like we do in Houston, a raised bed is not a bad idea.   
  • Because tomatoes can be susceptible to soil-bourne diseases, try to select a spot where you have not recently grown tomatoes.  Some suggest selecting a spot where no solonocae (eggplants, peppers, etc) have recently grown.
  • Plan to mulch heavily around your tomato plants.
Choosing your tomato varieties
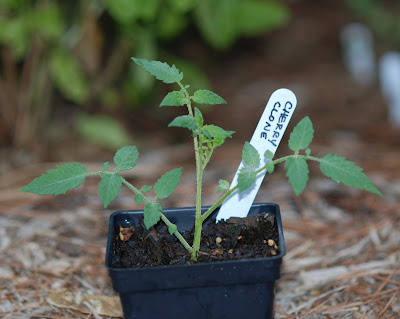
If you are a novice tomato grower, focus on cherry tomatoes.  These tomatoes are much easier to grow in in Zone 9, and you will be rewarded with heavy production for a long period, even in the hottest months, if you grow these small tomatoes.  Two of our favorite varieties are Yellow Pear (above) and Matt's Wild Cherry (below).   Standard tomatoes are much fussier and challenging, but the pay-off is amazing.  If you want to also grow a full-size tomato, select one that suits your preferences for flavor, size and color.  Our instructions below work for cherry or standard tomatoes.

Starting your seeds and Transplanting

We recommend that you start your seeds in grower pots.  If you start with good seeds (see our sidebar for some of our favorite seed suppliers), tomatoes have an excellent germination rate, so you don't need to start thousands of seeds.  Keep the seedlings watered and make sure they get lots of light so they don't become too leggy.  Once they have developed three or four sets of leaves, pinch off the bottom leaves and transplant into the garden.  Plant so that the spot where you pinched the leaves is BELOW the soil level.  Roots will develop here, producing a plant with extensive, deep roots that will help protect the plant from our summer heat.
Drive a stake into the ground when you transplant the seedling, and gently secure the seedling to the stake. We use bamboo from our garden and recycled twist ties for this.

 If you plan to use cages, select a sturdy one, and place it in the ground when you transplant the seedlings.  If you wait until the seedling grows into a large plant first, you risk seriously damaging the plant when you try to squeeze it into the cage.

Seedling care

Tomatoes like consistent water, although not too much.  Here in Houston we have sudden, intense rain storms which make that difficult.  Our advise is to not stress about what you can't control, and just water your seedlings at regular intervals if there is no rain.  Mulch will help keep the soil evenly moist.   If you started with fertile soil, you should not need to amend during the growing season.

As the seedlings develop, they will form suckers.  You can read our post on suckers and their removal, and how to convert suckers into new seedlings to share with friends and family.

Fruit Production
Tomatoes have "perfect" flowers which means there are no male and female flowers.   This generally means easier fruit production, but if you don't want to take any chances, you can always hand-pollinate your plants.  This is extremely easy, and one of the few gardening projects that produces results in just a few days.  If you have the time, we highly recommend hand-pollination.

Fruit Harvest
Cherry tomatoes do not tend to have significant pest problems, so we leave them to fully ripen on the plant.  They taste amazing this way.  They grow in clusters, so you should be able to harvest several at one time. With full-size tomatoes, we have often waited one day too long only to find a big chunk taken our of our tomatoes by a bird, or to see cracks forming in the tomato skin.  We suggest harvesting your full-size tomatoes when they are close to mature, then letting them fully ripen in the safety of your kitchen.

Seed Collection

If you are growing an heirloom tomato variety (as opposed to a hybrid variety), you should collect seeds from your biggest and most beautiful fruit.  Since tomatoes have "perfect" flowers, there's little risk of cross-pollination even if you are growing more than one tomato variety.  This means your seeds will produce seedlings true to their variety as opposed to a combination of yellow pear and wild cherry.

Simply squeeze the seeds into a thin-meshed sieve, then rinse well with clean water.  Spread the seeds out on paper towels to dry, then store in an envelope or plastic bag for next year.  Be sure to label your seeds with the collection date and variety name.  In Zone 9, we start a second crop of tomatoes in the fall, so you may end up using these collected seeds later this year.

Organic Gardening
We don't use chemicals or pesticides in our garden.  We don't want to expose ourselves, our kids, and our neighbors to those chemicals.  Our garden has been organic since we purchased our house 14 years ago, and we have never had a pest problem with one exception, the squash vine borer, which wiped out our zucchini and squash plants last year.  The squash vine borer is the caterpillar of a moth which lays it's eggs on squash plants.

Similarly, tomatoes attract a moth which lays eggs that hatch into the tomato hornworm, a surprisingly beautiful caterpillar despite it's nasty ways.  We had a few hornworms last year, easy to spot when you notice plant stems that are missing all their leaves, but most were eliminated early on by garden predators.  We just picked off the few we discovered (and sent them to an early death).  They did not seriously interfere with our tomato fruit production, and are certainly not worth straying from your commitment to organic gardening.
Our natural predators include dragonflies and lady bugs (above) as well as birds, frogs, wasps, and assassin bugs.  Above is a wasp nest (made out of mud) with two pupa inside.  Unfortunately, this nest was built right above our kitchen door and the wasps got a little too aggressive every time we entered or left the house, so we knocked down the nest.  The wasps returned to the spot of the nest for several days before building a new one under our roof overhang.

Reading about Tomatoes

If we have sparked an urge to read and learn more about tomatoes, there are several excellent books that we recommend.   Smith and Hawken has published a nice guide to heirloom tomato varieties, and Amy Goldman's book on heirloom tomatoes is full of gorgeous pictures that will make it almost impossible for you to choose only one variety.  We also recommend Elioit Coleman and Edward Smith for good, basic tomato growing advice.  Online, Urban Harvest has several excellent articles and lots of useful advice for growing tomatoes and other vegetables in Houston (or similar climates).

Other posts in the Get Growing Series

StumbleUpon.com

Thursday, January 28, 2010

Italian Cheese Fritters with Spicy Tomato Sauce


We decided to create our own version of the cheese fritters served at New York's Landmarc restaurant.  It turns out the chef, Marc Murphy, has posted not only the recipe, but step-by-step instructions with photos.  There's even a video demonstration on-line.  So much for the challenge of re-creating a secret restaurant recipe.  It's so quick, it will take you longer to read this posting than to prepare the fritter batter.  If you have more batter than you need, refrigerate the extra for up to one day.

We prepared a spicy tomato dipping sauce to go with the fritters.  The sauce requires over an hour on the stove, so we suggest you prepare the sauce first.  You may have extra sauce, which stores well in the refrigerator for several days.

Italian Cheese Fritters

Ingredients

1           lb          fresh ricotta
1/4        lb          smoked mozzarella cheese, cubed
4           oz         parmesan, shredded
3/4        cup       whole milk
3                        eggs
3/4        cup       unbleached A.P. flour
1/2        tsp        baking powder
                          sea salt and black pepper to taste

Procedure
  1. Combine cheese, milk and eggs.
  2. Combine flour, baking powder, salt and pepper.  Add to cheese mixture.
  3. Heat vegetable oil to 350° in deep pot.  Line some baking sheets with paper towels, and have some type of tongs or strainer ready.  We use a chinese wire mesh strainer.
  4. Spoon batter into hot oil -- a heaping tablespoon -- being careful to avoid splattering the oil.  Drop the batter onto the surface of oil.
  5. Fry until golden brown, 2-3 minutes, using strainer to cook fritters evenly on both sides.
  6. Remove from oil to paper towels to cool and dry about 5 minutes before serving. 

Spicy Tomato Sauce

Ingredients

3            Tbs          olive oil
1                            onion, chopped
6                            garlic cloves, minced
1/2         Tbs          marjoram
2 1/2      Tbs          oregano
2            Tbs           fresh basil
3/4         tsp            red pepper flakes
                              or minced dried chile pepper
4            lb             fresh tomatoes, skins removed, seeded and diced

1            cup          canned crushed tomatoes
1/2        cup           dry red wine
                              sea salt and black pepper

Procedure
  1. Saute onion, garlic, and spices over medium until onion is translucent, about 10 minutes.
  2. Add fresh tomatoes, crushed tomatoes, and wine.  Simmer gently, uncovered, until sauce thickens, about 75 minutes.  Season with salt and pepper.

StumbleUpon.com

Monday, November 23, 2009

Grilled Eggplant, Haloumi and Arugula Sandwich


Sandwich perfection. Cloud Nine eggplant, Matt's Wild Cherry tomatoes, arugula and Marketmore cucumbers from the garden. Grilled haloumi cheese and tahini yogurt sauce on grilled sourdough bread.  Try to stop at just one.


Grilled Eggplant, Haloumi and Arugula Sandwich with Yogurt Tahini Sauce
serves 2 (barely)

Ingredients

1/2      pound     Cloud Nine or Asian eggplant, sliced thinly
4         oz           Haloumi cheese, sliced
1                        cucumber, cut into strips
12                      cherry tomatoes (more or less)
1/2      cup         arugula (more or less -- ours is VERY strong)
1         cup         thick Greek yogurt
3         Tbs         tahini
1/2                    garlic clove, minced


Procedure
  1. Prepare sauce:  combine yogurt, tahini and minced garlic.  Mix well.
  2. Saute eggplant in olive oil over medium heat until golden brown.  Flip and repeat.  Remove to paper towels to dry.
  3. In same pan, add 1 Tb butter and melt.  Add more olive oil if needed. Grill slices of sourdough until golden and crusty.  Flip and repeat.  Remove and set aside.
  4. In same pan (add more butter and olive oil if needed), saute haloumi until melted and brown.  Flip and repeat.
  5. Assemble sandwiches:  generously spread yogurt tahini sauce on both sides of bread.  Add eggplant, then haloumi, then tomatoes, cucumbers and arugula. 

StumbleUpon.com

Wednesday, November 18, 2009

Stewed Eggplant, Tomato and Chickpea


Continuing to celebrate the month of the pomegranate, pomegranate syrup and sugar sweeten this savory dish which uses Thai long green eggplant, tomatoes and parsley from the garden; simmering enhances the natural sugars in the tomatoes.  These sweet undertones create a rich and flavorful eggplant dish that works as either a side dish or meal.   Although December is just a few weeks away, the Thai long green eggplants are loaded with fruit and flowers thanks to the mild autumn we have been enjoying.  This is another eggplant variety that deserves a spot in next year's vegetable garden.

Stewed Eggplant, Tomato and Chickpea
based on a recipe by Claudia Roden in Arabesque
serves 2 as an entree
 

Ingredients

1        pound        asian-style eggplant
3                         garlic cloves, minced
1        pound        tomatoes
1        tsp             sugar
2 1/2 Tbs             pomegranate syrup
14      oz              chickpeas
2        Tbs            Italian parsley, chopped
                            olive oil
                            salt and black pepper

Procedure
  1. Cut an "X" on the bottom of each tomato.  Place in boiling water for one minute, remove with slotted spoon.  When cool, remove skin with your fingers and chop.
  2. Thinly slice eggplant and saute in olive oil over medium until browned.  Flip over and repeat.  Remove to paper towels to dry.
  3. In same pan, heat garlic in olive oil until just beginning to color.  Add tomatoes and stir.  Add sugar, salt and black pepper and cook for 15 minutes.  
  4. Add 1 1/2 T pomegranate syrup, eggplant and chickpeas and simmer until eggplant is very tender.  Add 1 more T pomegranate syrup, salt and pepper to taste.  Cook briefly and serve, with parsley sprinkled on top.

StumbleUpon.com

Tuesday, November 3, 2009

Eggplant, Black Bean and Cotija Tostada with Spicy Tomatillo Jalapeno Salsa


We don't do much southwestern cooking at home, so my image of tostados is from Taco Bell commercials.   I pictured a crunchy, deep-fried shell with little taste, but our tostados were soft and golden brown with lots of fresh corn flavor.  The trick is to gently fry the tortillas just before assembling your tostadas.  The Spicy tomatillo jalapeno salsa can be made ahead of time, so just pick your fresh eggplant and tomatoes and dinner will be ready in no time.  We used Cloud Nine and Thai Hybrid Tiger eggplants, Matt's Wild Cherry tomatoes and cilantro from the garden. I wish we had an avocado tree, but for now the avocados are store-bought.

Eggplant, Black Bean and Cotija Tostados with Spicy Tomatillo Jalapeno Salsa 
(makes enough for 4-6 depending on how much you load the tostadas)

Ingredients

2                 garlic cloves, chopped
1/4    cup     cilantro (or what you pick from the garden), chopped
2       cans    black beans (30 oz total), drained and rinsed
3/4    tsp      salt
1       lb       eggplant, sliced thinly
2                 avocado, chopped
1       pkg    corn tortillas
1       cup     cotija cheese, grated
1       cup     cherry tomatoes
                   Spicy Tomatillo Jalapeno Salsa
                   vegetable oil, olive oil

Procedure
  1. Combine beans with 2 cups water and bring to a simmer uncovered.  Cook about 20 minutes, stirring occasionally.  Drain beans but RESERVE LIQUID.  
  2. Puree beans, 1/4 cup of cooking liquid, and garlic until smooth
  3. Heat some olive oil in a pan over medium heat and fry eggplant until golden brown.  Flip and repeat.  Remove from pan to paper towels to dry.
  4. Heat 3 Tbs vegetable oil over moderate heat, then add beans and cook until very thick, about 5 minutes.  Add salt and remove from stove.  You may have extra beans (we did).  If so, refrigerate and use later.  If beans get too thick to spread, just add some more of the reserved cooking liquid.
  5. Heat tortillas in vegetable oil over moderate heat until golden brown.  Flip over and repeat.
  6. Assemble tostadas:  spread beans over bottom, then salsa, then eggplant slices, avocado, and tomatoes.  Top with cheese and sprinkle with cilantro.

StumbleUpon.com

Thursday, September 24, 2009

Fall Seedlings


After just two days in the ground, the French Breakfast radish (from Seed Saver's) and Purple Top White Globe turnips (from Botanical Interests) have already sprouted.  The American Purple Top Yellow rutabagas (from Southern Exposure) are also popping up.  We've had very heavy rain the last few days, although nothing like the 20 inches dumped on Georgia, and I was worried that the seeds might be washed away.  Instead, they seem to appreciate the moisture and the cooler weather it brought.  I see the beginnings of the broccoli and beets emerging, but still no sign of the brussel sprouts, fava beans, radicchio or orach.  The seeds in our window boxes, nasturtium and mache, haven't done anything yet either, nor have the parsley and dill seeds I planted among the existing herb plants.  Mountain cress seeds were quick to germinate in the garden, and will soon need to be thinned.  This is the first time I've grown mountain cress, and I look forward to experimenting with it in salads and on sandwiches.


The fall tomato transplants look fantastic.  The Matt's Wild Cherry (seeds from Southern Exposure) have lots of little green tomatoes already.  The cherry tomato plant I started from collected seed has lots of flowers, but no fruit yet.  The Green Zebras look like they'll be the last to set fruit.  I discovered three tomato hornworm caterpillars on one of the Green Zebras.  I pulled them off and smashed them in the driveway, shocking David.  He said my behavior was very un-vegetarianlike, but I had no qualms about eliminating those garden pests in order to save our tomato plants.

StumbleUpon.com

Friday, September 11, 2009

Fall tomatoes are starting to bloom

I started "Green Zebra" tomato seeds from Botanical Interests and "Matt's Wild Cherry" from Southern Exposure in mid-June, and started another batch of tomato seeds at the end of June. The second group included the "Heirloom Rainbow Blend" seeds from Park Seed, plus cherry and roma tomato seeds I collected myself from tomatoes purchased at the farmer's market. I started transplanting seedlings at the end of July, and finished getting everything into the garden by mid-August.

The plants have done well despite the extremely hot, dry weather we've experienced until recently, and most are tall and full now. Both types of cherry tomato plants are already loaded with flowers, and the Green Zebra's are starting to bud out. The Heirloom Rainbow Blend seedlings were the last to be transplanted (it's only been about 3 weeks), and they are still small compared to the earlier transplants, so they will be the last to bear fruit.

This is my first experience with tomatoes started from seed rather than nursery seedlings, and the plants look much sturdier and healthier than those I planted back in the spring from purchased plants. It's still too early to make a full comparison because there aren't any fall tomatoes yet, but my early assessment is that starting with seeds is the way to go for healthy plants. Of course, another advantage is that seeds are a lot cheaper and there are many more varieties available.

I already have several varieties selected for next spring, although I'm trying to only select tomatoes that will thrive in our weather. It's hard not to be seduced by all the gorgeous photos and descriptions in the seed catalogs, but many varieties were not bred for Houston weather. For example, if "Siberian" is in the name, that's probably not a variety for us. I am definitely going to plant yellow pears again, and the Matt's Wild Cherry seems like a winner. For full-sized tomatoes, I'll see how the Green Zebras and Heirlooms work out this fall.

StumbleUpon.com

Friday, September 4, 2009

Celebrating Suckers

My father is not much of a gardener, but he is a tomato fanatic, and he put much effort into his tomato plants when I was growing up. Now that I have tasted our own home-grown tomatoes, I understand why he chose tomatoes as his pet gardening project. I don't recall much about his tomatoes, but I distinctly remember him complaining constantly about all the suckers on his plants.

I never learned what suckers actually were until growing tomato plants myself. As tomato plants mature, they develop little stems growing at a 45 degree angle between the main stem and side branches. In our garden, these suckers are particularly prevalent on the cherry tomato plants I planted in early August. Suckers should be pinched off to enable the plant to focus all its energy on developing the main stem and branches. Suckers eventually make for a messy, sprawling plant that is hard to control, and they take resources away from fruit development once the plants start flowering.

But suckers are not all bad, because each one can easily be turned into a new tomato plant that is a clone of the original. First, pinch off the sucker gently to avoid crushing the stem. Next, plant the sucker in a grower pot in moist soil, and then keep the pot shaded and the soil damp for several days. The stem may look wilted at first, but it will quickly develop roots and transform from a sucker to a tomato seedling. If you've purchased your plants from a nursery, this is a great way to save money by creating additional plants for free. Our plants were started from seed, and we don't need any more tomato plants in the already-crowded garden, so I'm going to pot the seedlings up and give them to my dad so he can have his own fall tomato harvest. I love the irony of giving him plants grown from his old enemy, the sucker.

StumbleUpon.com

Monday, August 31, 2009

Jerusalem Salad, Houston-Style


David and I love middle-eastern food. We have a great collection of cookbooks devoted to the topic. Our favorites include:

Silk Road Cooking: A Vegetarian Journey by Najmieh Batmanglij
The New Book of Middle Eastern Food by Claudia Roden
The Cooking of the Eastern Mediterranean by Paula Wolfert
Spice by Ana Sortun
The Arab Table by May Bsisu
The Foods of Israel Today by Joan Nathan

We cook often from these books, and have rarely been disappointed. Each book is particularly strong in certain areas. For example, Batmanglij's book has the best stews and Sortun's book is excellent when you want to focus on particular ingredients.

Our favorite recipe this summer has been the Jerusalem Salad from Bsisu's book. David has adapted it a bit to utilize the vegetables we have in our garden, with great results. The salad is very flexible, enabling you to change the salad components to accommodate the vegetables that you have on hand. But, you must not deviate from the dressing recipe. It's the critical component that pulls the salad together, regardless of which vegetables you choose to include.


Jerusalem Salad (Salatat Kudsiyeh) adapted from Mary Bsisu

1 1/2 pounds firm tomatoes, seeded and finely chopped (we use our cherry tomatoes)
3 small cucumbers or 1 large cucumber, finely chopped
1 medium white onion, finely chopped
1 cup feta cheese (this is not in Bsisu's recipe, but it's a great addition)
2 cups fresh greens, finely chopped (we use a mix of whatever greens we have, and always include our arugula; the original recipe calls for romaine)
1/4 cup fresh lemon juice
1/4 cup extra virgin olive oil
1/3 cup tahini
2 Tablespoons white vinegar
Salt and Black Pepper to taste

1. Combine all the vegetables and the cheese.

2. Whisk together dressing ingredients until creamy and pale. If too thick, add a bit of water. If too thin, add more tahini. Add salt and pepper to taste.

3. Add dressing at last minute or salad will become soggy

4. Serve with warm pita bread


StumbleUpon.com

Saturday, August 22, 2009

Houston Summer Salad with Heirloom Eggplant


Inspired by a Caprese Salad, David added eggplant and arugula to create a Houston Summer Salad. It's made entirely with ingredients from our garden with the exception of the fresh mozzarella. All the elements grow well in our hot weather, especially the eggplants which have produced a bumper crop for the last few weeks. We have so much eggplant that we are giving it away to neighbors who are both excited and grateful. I have explained that our Sfumata, Thai Long Green and Cloud Nines are in fact eggplants despite their unusual color and shape, and David has been doling out eggplant cooking advice and recipes.


If you have a vegetable garden in Houston, grow eggplant and your neighbors will love you. And, make this salad for a great August lunch.

Houston Summer Salad with Heirloom Eggplant

1 Medium Eggplant, sliced thinly
I Medium Tomato (or several cherry tomatoes), cubed
1 T Basil, diced
1/4 C Arugula, very coarsely chopped
1/2 C Fresh Mozzarella, thinly sliced

Step 1: Heat frying pan with olive oil. Fry eggplant until starting to brown on one side, then flip over. When second side is golden brown, remove from pan and place on paper towels to dry.
Step 2: Toss all ingredients together with the vinaigrette of your choice. David's simple vinaigrette is 3T olive oil plus 1 T white wine vinegar, and a pinch of sea salt and a pinch of black pepper.

StumbleUpon.com

Thursday, August 6, 2009

Becoming a Tomato Convert

I've never been a huge tomato fan, so we only planted a few tomato plants this spring. Due to my ambivalence, I let my younger son select the plants. We didn't do any research ahead of time, trusting the nursery to have plants well-suited to our hot weather. My son is a ketchup fanatic -- we buy ketchup by the case from our restaurant wholesaler just for him -- and he had visions of vats of homemade ketchup. We ended up with Better Boy and Yellow Pear tomatoes (2 plants each), plus one that was labeled Yellow Pear but is in fact a big red tomato.


The Mystery Tomato has consistently outperformed the Better Boy, and I wish I could identify it. I asked the nursery where we purchased the plant for help, but they said the plants arrive already labeled by the grower, making an identification impossible. We haven't exactly had a bumper crop, but the lone Mystery plant has produced big red tomatoes all summer. Not to sound cliche, but they are dramatically better than the "heirloom" tomatoes that David has been bringing home from Central Market. They don't always look perfect, but the taste is exceptional -- nice texture, sweet, no slime in the center. These tomatoes turned my thinking about tomatoes around.

The Better Boy tomatoes, on the other hand, have been a disappointment. The first fruits all suffered from blossom-end rot, turning black and ugly on the bottoms. Then the birds started pecking holes in the tomatoes -- not big, but enough to ruin the fruit. Perhaps the problem is one of location. The Better Boy plants are right under a mature pine tree. They get plenty of sun, but the birds must sit up there ogling the tomatoes until they're the perfect degree of ripeness to attack.

The best tomato production by far has been from our Yellow Pear plants. I've picked a small bowlful of tomatoes almost every day since early June. We have so many Yellow Pears on hand that David has a hard time keeping up with supply. I can't stand to see them go to waste, so we have been eating dishes with Yellow Pear tomatoes almost every night. From a chef's perspective, David prefers the large tomatoes because they're easier to work with. But from a gardener's perspective, these little tomatoes are my favorite. The plants are highly productive, need absolutely no attention, and the tomatoes taste great. The brilliant yellow color is an added bonus, and they keep their color when cooked. We haven't had any pest or disease problems yet despite the heat. The plants are a big sprawling mess because I didn't do a good job staking them, but they continue to grow and produce. I even find beautiful ripe tomatoes on branches growing on the ground.

In Houston, we get two chances to plant tomatoes -- spring and fall. Given my newfound appreciation for a good tomato, I put more thought into which tomatoes to plant for fall. I started everything from seed this time instead of buying plants. I selected "Green Zebra" from Botanical Interests, "Matt's Wild Cherry" from Southern Exposure, and a pack of 30 assorted heirloom tomatoes from Park Seeds. The great thing about the assortment is that for just a few bucks I got seeds for 6 different types of tomatoes. The negative is that I can't tell which seedlings will produce which tomatoes, so I have to try to plant as many of them as possible. I don't have room for 30 tomato plants (plus my Green Zebras and Wild Cherrys), so I'm thinking about planting some in pots and sharing them with family and friends.

I also collected seeds from two tomatoes I bought at our Farmer's Market -- a red cherry tomato, and a red roma tomato. Local growers know which varieties grow well in Houston, so I expect those tomatoes to be successful in our garden. The seeds were easy to collect. I removed the seeds from the viscous centers in a fine-meshed sieve. I then rinsed them well, and let them dry on a paper towel. Many of the seeds stuck to the paper towel after they dried, so I just tore around the paper a bit and stuck all the seeds in envelopes. The seeds germinated extremely well (despite the bits of paper towel stuck to them). I'll never know the variety of either tomato, but we've had good luck this summer with mystery tomatoes. The challenge will be finding room for still more tomato plants.

StumbleUpon.com